By Gary Oliaro (earthmode.org) - Web page created by Larry Cochrane
Updated: 11/11/2016
Below you will find a step-by-step description on how to run WinSDR and WinQuake on a Raspberry Pi Single Board Computer.
Items you will require to run WinSDR on a Raspberry Pi 3
1. Raspberry Pi 3 B and a good quality 5V 2.5A power adapter. The Pi will crash
or corrupt the file system if the voltage drops below 4.65 volts, as indicated
by the RED power light blinking. I’m now using a 5.25V supply.
2. Micro SD, SDHC or SDXC card. An SDXC card ranges from 32GB to 2TB. I
used a 64GB card, Ultra High Speed (UHS-1) card with 80MB read and 50MB write
speed, but a less expensive ($18) class 10 card will probably work well also.
3. USB keyboard, mouse and HDMI monitor. An old VGA or DVI monitor will
work with the proper adapters available online at low cost.
4. A copy of Eltechs, ExaGear Desktop for the R-Pi3 at $27.45. There are six
versions available including the R-Pi2. It would be interesting to see how
WinSDR runs on the R-Pi2, but you will require another license for this
platform. Note the R-Pi3 version is marked with BETA on the website.
5. Go to raspberrypi.org and download the full Raspbian Jessie, March
2016 or later.
Unzip the file 2016-03-18-raspbian-jessie.img.
6. Download “Win32 Disk Imager” and burn the Raspbian image to your SD card.
7. Start up the Pi with your micro SD card and you will quickly boot into the
Raspbian desktop.
8. Go to Menu, Preferences, Raspberry Pi Configuration and under the System Tab,
click "Expand Filesystem". Now click on Keyboards in the upper
9. In the top upper right select your wireless network name and supply your
password. Also Select the Keyboards and select you keyboard layout. It’s set
to UK so change as required.
10. Open a terminal session from the icon in the upper left of the screen and
type the following commands
$ sudo apt-get update
$ sudo apt-get dist-upgrade
$ sudo apt-get clean
This will take awhile, but will insure you have the latest software versions.
11. Download the ExaGear Desktop which will go to /home/pi/Downloads. Also put
the license file from your Eltechs email into this same Downloads directory.
12. Untar the package and install.
$ cd /home/pi/Downloads
$ tar -xvzpf exagear-desktop-rpi3.tar.gz
$ sudo ./install-exagear.sh
13. Print out and read the Eltechs_ExaGear_Desktop_guide_1.4.pdf which is now in
the ~/Downloads directory.
14. To start ExaGear use the newly created desktop icon or in a command line
type:
$ exagear
You will now be in the guest image root directory, /opt/exagear/images/debian-8-wine2g.
ExaGear tries to select the best guest image for your system, here,
debian-8-wine2g. Switch back and forth between the ARM architecture and x686
architecture as described in the PDF, to get a feel for the different
environments.
$ arch
and
$ uname -a
15. Update apt-get repositories on the first launch of the guest system by doing the following command:
$ sudo apt-get update
16. Next install Wine:
$ sudo apt-get install wine
17. Now download winsdr475_32bit.exe also to the ~/Downloads directory.
18. Here is where the magic begins. In the x686 environment run the following
command:
$ wine winsdr475_32bit.exe
WinSDR will now install and put an icon on the Raspbian desktop!
19. Plug in Larry's A to D board (I have 16bit, 8 channel USB boards, but Larry
has successfully used his 24bit board.) into one of the available USB ports on
the Pi.
20. Double click the WinSDR icon and you will get a COM 1 not available message,
but WinSDR will run normally.
21. As Larry points out in his Linux documentation run the following command in
a terminal session.
$ ln -s /dev/ttyUSB0/ ~/.wine/dosdevices/com1
22. Now you have a fully functioning Winsdr on your Raspberry Pi. WinQuake
also runs!
23. You need to edit the /boot/config.txt using the nano, vi or vim editor and
add the following lines:
framebuffer_depth=24
framebuffer_ignore_alpha=1
Do this using the following command:
$ sudo nano /boot/config.txt
For the old-timers out there, you will be presented with a WordStar word
processor interface. Just add the lines and ^x, y to save the file. This
will allow the proper color mapping in WinSDR and WinQuake. Raspbian defaults to
a depth of 16 bits.
Also, http://www.codeclinic.de/2014/01/raspberry-pi-tutorial-setting-vnc-raspbian-pt1/
is a great resource for getting either Tightvnc or x11vnc running on the Pi.
Each has it’s advantages. I prefer the x11vnc method, but it seems to
require more CPU cycles than Tightvnc.
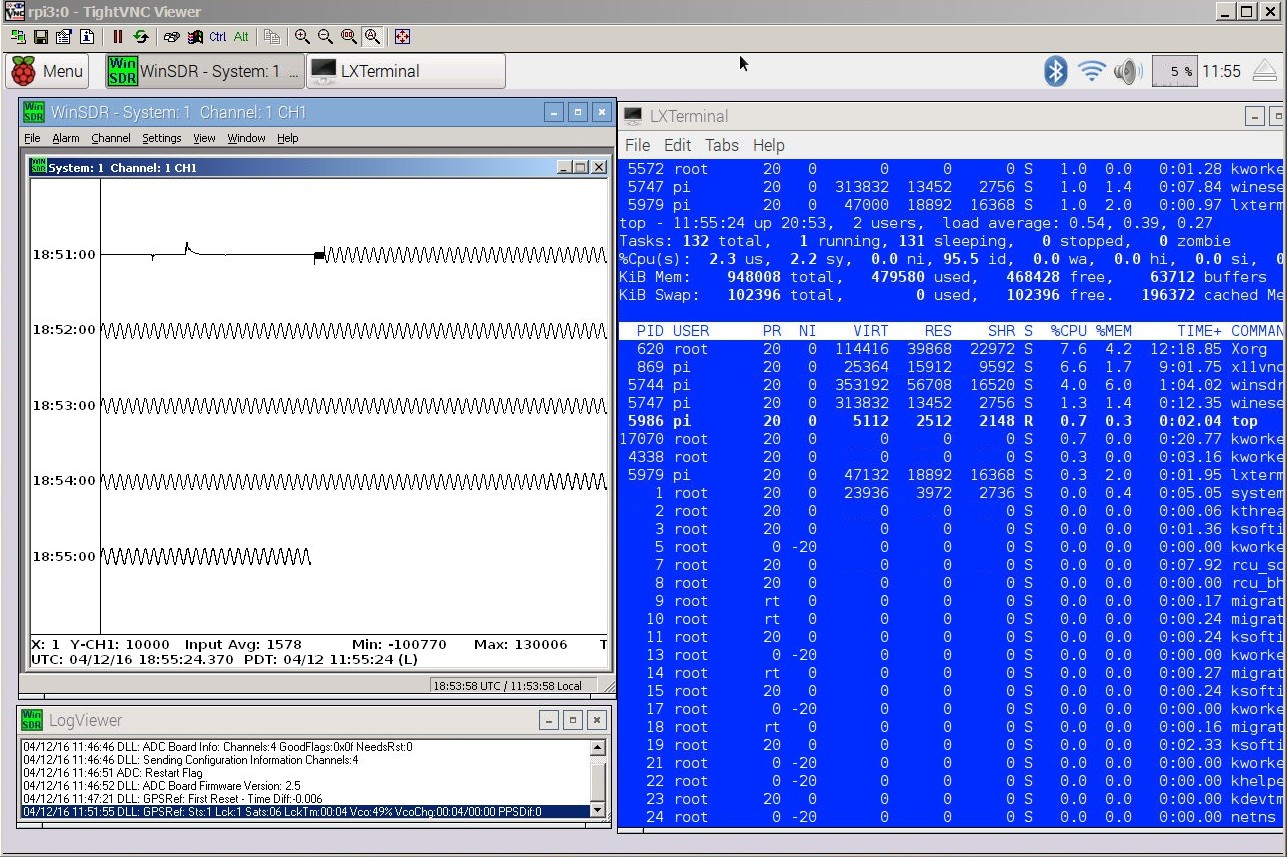
Screenshot of WinSDR running on a Raspberry Pi
Power Test
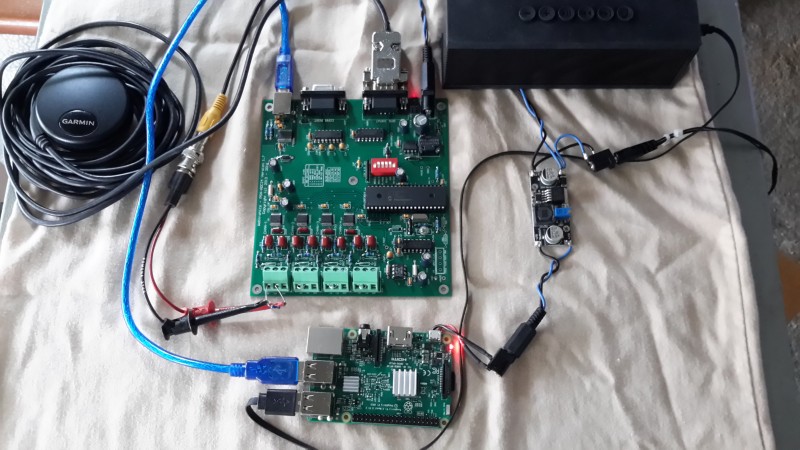
I was curious about the power requirements to run a complete digitizer including the Pi 3 and A/D board. For my test I used a 9VDC wall mounted power supply with a .1 ohm resistor in the +9VDC line to monitor the current. The +9VDC was connected to a PSN-ADC24 board and also to a step down switching power supply based on a LM2596 regulator chip. The output of the power supply was adjusted to 5VDC and used to power the Raspberry Pi 3 board. Connected to the A/D board was a Garmin GPS18 LVC receiver. Connected to the Pi 3 board was a USB powered speaker. This was added so I could hear WinSDR's event alarm. The on-board Wifi was connected to the router and used to talk to the Pi 3 board using SSH or VNC.
The current draw was around 320ma @ 9V or just a little below 3 watts. This does not included any display connected to the Pi 3. The 5" LCD display I have adds another ~1.5 watts.
Regarding the display. The 5" touch LCD display I have only has a resolution of 800x480. That's just not enough pixels to properly display WinSDR. I would recommend a larger display or just run the Pi headless (no keyboard, mouse or display) and use VNC to view the desktop. See the screenshot above.-Larry
Update: 09/07/16
Mike Kimzey on the fbv-topics mailing list sent the following message to the group regarding running WinSDR on a Raspberry PI board;
Hi All.
Just wanted to add my 2 cents regarding the install of WinSDR on a Raspberry.
After a long hiatus that included a move to a new home, I have finally unpacked my Volksmeter. Much of the impetus was due to the possibility of
running it from a Raspberry Pi 3. This past weekend I installed the Raspbian OS and then the Exagear product. (ordering from them was very
easy and I had a license and download link within a few minutes.) I've worked with Linux and know some commands, but still consider myself a
noob. One of the things I didn't understand is that the Exagear download is actually several different, yet complete, flavors of Linux, i.e., you
get to decide if you want to install Debian or Ubuntu. These are all included in the download. You don't actually go to Ubuntu and download
their product.
Next, I installed Rasbian Jessie and followed all the instructions by Gary Oliaro posted at Larry's site (a big thanks to both of you! ...very helpful!)
So, some notes...
When you install Jessie, Exagear then installs Debian 8 (not 7 like in the instructions). Because of this, I don't think Wine is automatically
installed (or at least it didn't appear to be on my system) so I had to install it myself. Not a big deal, the install went smoothly. I think you
have the option to force a Debian 7 install, but I went with the automated install.
Next, in the Exagear instructions, when you are in a guest image, your prompt appears as " xxx@x86 : $ " with the "*x86*" indicating that you are
in a shell of the guest image. My prompt does not, and that was a little confusing. If someone knows why, please let me know.
Installation of WinSDR went smoothly, and the icon appears on the desktop. (I agree with the instruction...it really is magic!). When you double
click on it, the x86 guest environment is invoked and WinSDR starts.
Then the fun began. WinSDR would not recognize the Volksmeter, either with the serial interface or with the USB interface. I kept getting errors that
there was no USB input, yet I followed the directions of mapping the USB0 toCOM1 with " ln -s /dev/ttyUSB0 ~/.wine/dosdevices/com1 "
I checked the serial port with " dmesg | grep tty " and there was clear indication that the raspberry was seeing the FTDI A/D board.
I spent all day thinking about it and when I got home, decided to see if there was a com port conflict, so I changed the port mapping to COM2 with
" ln -s /dev/ttyUSB0 ~/.wine/dosdevices/com2 " And with that, WinSDR started working. So, I'm not sure if COM1 is already
in use on some Raspberry Pi's, but I had to go with COM2.
Again, thanks for all the heavy lifting with those initial instructions, Gary. I hope these additional notes are helpful to someone.
Regards,
- Mike Kimzey
Update 11/11/16:
One of the PSN list members Brett Nordgren has been running two copies of WinSDR on a Raspberry Pi 2 board. He ran into the problem of the RPI board switching the assignment of the USB device names at boot-up time. Here is his email message to the group regarding the problem and how he fixed it.
I have been setting up my Raspberry Pi to run two of Larry's A/D's,
which are now running nicely. I have a Raspberry Pi 2, with Exagear's
X86-ARM emulator, the X11 desktop, Raspbian and wine.
Attached are two Webtronics A/D's, one 16-bit with a Serial output which
goes through a Serial-to-USB converter to the Raspberry Pi. The other is
a 24-bit A/D with USB output, connected directly to another R-Pi USB port.
However I ran into a problem when rebooting the Pi, when the Com port
assignments would unexpectedly get switched between the two devices,
which caused the two WinSDR instances to confuse and corrupt their
'winsdr.ini' settings files.
In a previous message, Larry Cochrane pointed to how to have each device
be identified by its vendor and product number, which get accessed at
boot up, thereby allowing the port assignments to be controlled.
That leaves the problem of having two identical A/D's connected, which I
assume might still not get uniquely identified. However in addition to
vendor and product, each USB device also reports a unique serial number,
which should allow each individual device to be identified and assigned
an unchanging Com port number.
Being a real newbie at Linux and its related systems, it took me a while
to discover exactly how to do what I wanted.A detailed description of
the process, written for people like me who have limited experience with
Linux can be found at: http://bnordgren.org/seismo/RPi/RPi_com_port_assignment.pdf
I hope that might be helpful to anyone wanting to set up their Raspberry
Pi with Webtronics A/D's.
Enjoy,
Brett