Contents:
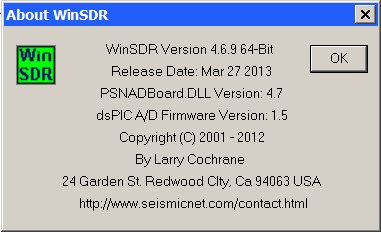
This dialog box displays the WinSDR version number, release date, PSNADBoard.dll version number, ADC board firmware number, Copyright dates and author information. This dialog box is opened by using the Help / About WinSDR menu items.
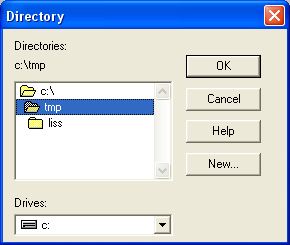
This dialog box is used by other dialog boxes to change or create a new directory or folder on your computer or networked computer systems.
Directory Text:
Displays currently selected directory.
Directory List Box:
Displays a list of directories based on the currently selected drive (see below). To select a directory, double click on one of the directory names.
Drives Select Box:
Used to select the disk drive used by the Directory List box.
OK Button:
Close dialog box and use directory.
Cancel Button:
Close dialog box without using directory.
Help Button:
Opens this document.
New Button:
Used to create a new directory.
[Top]
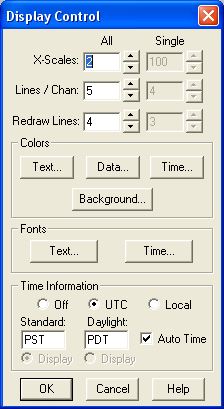
This dialog box is used to control the Real-time Window display.
All Edit Boxes:
X-Scale:
Trace speed when WinSDR is displaying all channels.
Lines per Channel:
Number of lines to display when displaying all channels.
Redraw Lines:
Number of lines to redraw after the trace reaches the end of the screen. Must be less then the Lines per Channel setting. Entering 0 will disable any history information from being displayed.
Single Edit Boxes:
X-Scale:
Trace speed when WinSDR is displaying one channel.
Lines per Channel:
Number of lines to display when displaying one channel.
Redraw Lines:
Number of lines to redraw after the trace reaches the end of the screen. Must be less then the Lines per Channel setting. Entering 0 will disable any history information from being displayed.
Colors Group Box:
Text Button:
Opens the Colors dialog box. The dialog box is used to change the color of the text part of the status information displayed on the bottom of the window.
Data Button:
Opens the Colors dialog box. The dialog box is used to change the color of the data part of the status information displayed on the bottom of the window.
Time Button:
Opens the Colors dialog box. This dialog box is used to set the color of the GMT/UTC time information on the left hand side of the Real-time and Replay windows. This button will be enabled if UTC or Local Time is selected in the Time Information group box.
Background Button:
Opens the Colors dialog box. This dialog box is used to change the background color of the window.
Fonts Group:
Text Button:
Opens the Font dialog box. This dialog box is used to change the font of the status information text.
Time Button:
Opens the Font dialog box. This dialog box is used to change the font of the time information on the left hand side of the Real-time and Replay windows. This button will be enabled if UTC or Local Time is selected in the Time Information group box.
Time Information Group Box:
Off Button:
Turns off the time information text on the left hand side of the Real-time and Replay windows.
UTC Button:
Enables the time information text on the left hand side of the Real-time and Replay windows. UTC time is displayed.
Local Button:
Enables the time information text on the left hand side of the Real-time and Replay windows. Local time is displayed.
Standard Time Edit Box:
Enter your local Standard Time Zone abbreviation in this edit box. Example: PST (Pacific Standard Time) or EST (Eastern Standard Time).
Standard Time Display Button:
If checked, and the Auto Time check box is not checked, WinSDR will always display the Standard Time string in the GIF image files, if both GMT and Local time are being displayed, and in the Real-time window.
Daylight Time Edit Box:
Enter your local Daylight Time Zone abbreviation in this edit box. Example: PDT (Pacific Daylight Time) or EDT (Eastern Daylight Time).
Daylight Time Display Button:
If checked, and the Auto Time check box is not checked, WinSDR will always display the Daylight Time string in the GIF image files, if both GMT and Local time are being displayed, and in the Real-time window.
Auto Time Check Box:
If checked, WinSDR will automatically change the Standard and Daylight string based on the current day and time. If not checked, WinSDR will display the Time Zone string based on the Display Time check boxes.
OK Button:
Closes the dialog box. New information entered will be used by WinSDR.
Cancel Button:
Closes the dialog box without making any changes.
Help Button:
Opens this documentation.
[Top]
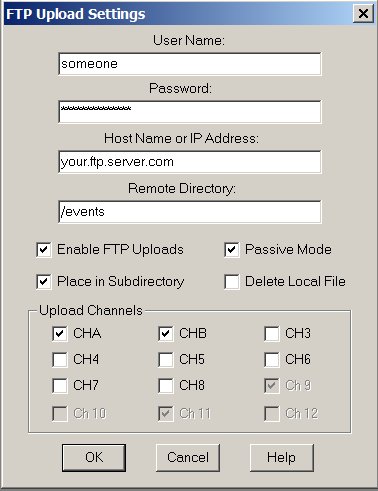
This dialog box is used to control the uploading of new event files to an FTP server after WinSDR has saved them to the local disk drive. This will happen when WinSDR detects an event using the Alarm detection process or if the user forces WinSDR to produce event files by using the File / Force Event Files menu items. By forcing WinSDR to produce and transfer event files, the user can check that everything is working correctly. Currently if you save event file(s) using the Replay or Real-time windows, the event files will not be transfer to the FTP server. If the Log FTP Upload Information check box in the Log File Settings dialog box is check, WinSDR will save FTP upload status information in the Log file and Log File Viewer. This information can be used to debug any problems you may be having uploading files to the FTP server. To control the uploading of GIF image files using the FTP protocol see the GIF Image Upload Settings dialog box.
User Name Edit Box:
Enter the user name in this edit box. You must have a user name and password for event file transfers to an FTP server located on the Internet or local LAN.
FTP Password Edit Box:
Enter the FTP server password in this edit box.
Host Name or IP Address Edit Box:
Enter the host name (Example: ftp.somedomain.com) or IP address (Example: 196.100.1.1) of the FTP server.
FTP Remote Directory Edit Box:
Enter the directory where WinSDR should place the new event file(s). WinSDR will create this directory if needed.
Enable FTP Uploads Check Box:
This is the master On / Off switch. If checked, WinSDR will upload new event file(s).
Passive Mode Check Box:
If checked, WinSDR will use the Passive FTP mode instead of the Active FTP transfer mode.
Place in Subdirectory Check Box:
If checked, WinSDR will save the event files in a subdirectory under the directory specified in the FTP Remote Directory edit box. The subdirectory name is based on the year and month of the event file. The format is YYMM (YY = year MM = Month). Example: If the remote directory is set to quakes and the event happened March 2002, WinSDR will save the event file(s) in /quakes/0203/.
Delete Local File:
If checked, WinSDR will delete the file on the local drive after the file has been transferred to the remote system.
Upload Channels Check Boxes:
Used to select the channel(s) that will be uploaded to the FTP server.
Ok Button:
Closes the dialog box. New information entered will be used by WinSDR.
Cancel Button:
Closes the dialog box without making any changes.
Help Button:
Opens this documentation.
[Top]
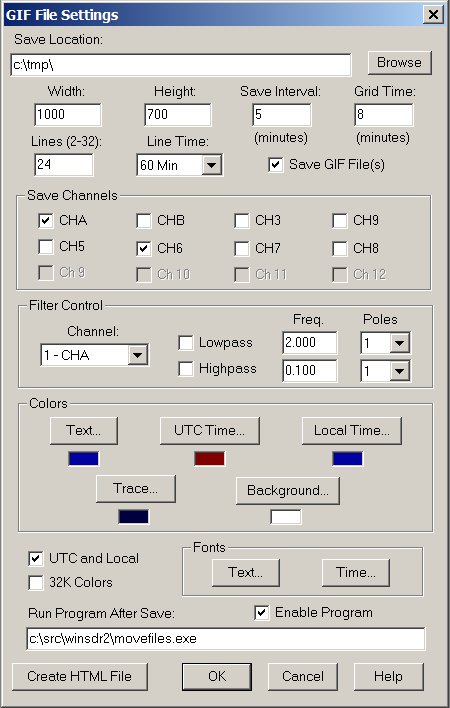
This dialog box is used to control GIF image file generation. The images well be saved in the directory specified in the GIF File Location edit box. The file name of each image is the Sensor_ID.gif.
GIF File Location Edit Box:
Used to enter the directory of the GIF file(s). You can also use the Browse button to select a directory.
Browse Button:
Used to select the directory that will be used to save the GIF image file(s).
Width Edit Box:
Controls the pixel width of the image. Input range 100 to 2000 pixels.
Height Edit Box:
Controls the pixel height of the image. Input range 100 to 2000 pixels.
Lines Edit Box:
Controls the number of lines to display. Input range 2 to 32 lines.
Line Time Select Box:
Controls how many minutes each line will be.
Save Interval Edit Box:
Controls how often WinSDR saves image file(s). Input range 5 to 60 minutes.
Grid Time Edit Box:
Controls how many grid lines WinSDR will display. 0 = No grid lines. Input range 0 to 30 minutes.
Save Channels Check Boxes:
This is the On / Off switch for each channel. If enabled WinSDR will create a GIF file.
Filter Group:
This group controls digital filtering of the data used to create the GIF images. A lowpass and / or a highpass filter can be enabled for each channel.
Channel Select Box:
Used to select the channel to enable or disable digital filter.
Lowpass Check Box:
Enables lowpass filtering of the selected channel.
Lowpass Frequency Edit Box:
Sets the lowpass filter cutoff frequency.
Lowpass Poles:
Sets the number of poles, or the steepness of the filter.
Highpass Check Box:
Enables highpass filtering of the selected channel.
Highpass Frequency Edit Box:
Sets the highpass filter cutoff frequency.
Highpass Poles:
Sets the number of poles, or the steepness of the filter, used to attenuate the incoming data.
Colors Group:
Text Button:
Sets the text information color.
UTC Time Button:
Sets the GMT or UTC time information color.
Local Time Button:
Sets the Local time information color if the GMT and Local check box is checked..
Trace Button:
Sets the trace color.
Background Button:
Sets the background color.
Save GIF File Check Box:
This is the master on/off switch for creating GIF images. If checked, WinSDR will save GIF image file(s).
UTC and Local Check Box:
If checked, WinSDR will display UTC and local time on the left hand side of the GIF image. Your local time zone strings (Example: PST or PDT) should be entered in the Display Control dialog box before enabling this option.
32K Colors Check Box:
Check this box if you have your video display set to 32 K colors.
Fonts Group:
Text Button:
Opens the Font dialog box. This dialog box is used to change the font of the text information text.
Time Button:
Opens the Font dialog box. This dialog box is used to change the font of the time information on the left hand side of the image.
Run Program After Save Edit Box:
This is a new feature in version 4.7.4. It allows the user to run a program after WinSDR saves the GIF image helicorder plots. Supplied to the external program is a list of GIF file names supplied as input parameters to the user's application. See Running a Program for more information.
Enable Program Check Box:
This controls the Run Program After Save feature. If checked, WinSDR will run the user's program after the GIF image files have been saved.
Create HTML Button:
Used to create a HTML file called CURRENT.HTML. This HTML file will display all of the selected channels in a web page. After creating this file, you can use the View / View GIF Images menu items to open the PSNExplorer Web browser and display the images in a browser window. The file will be created in the root directory of WinSDR.
OK Button:
Closes the dialog box. New information entered will be used by WinSDR.
Cancel Button:
Closes the dialog box without making any changes.
Help Button:
Opens this documentation.
[Top]
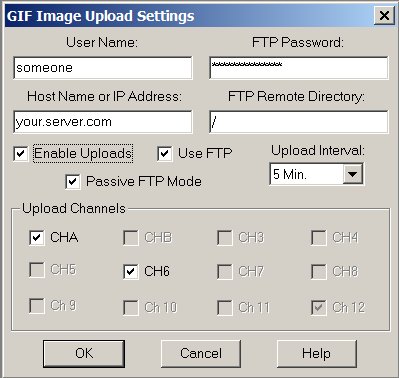
This dialog box controls the uploading of GIF image files to an FTP server or the PSN web site.
User Name Edit Box:
Enter the user name in this edit box. This field is used for both FTP transfers and uploading to the PSN Web site. You must have a user name, and password for FTP transfers, to upload image files to the PSN Image Server or an FTP server located on the Internet or local LAN. Please contact me if you would like to upload your image files to the PSN Web site.
FTP Password Edit Box:
Enter the FTP server password in this edit box. This field is only enabled if the FTP Mode check box is checked.
Host Name or IP Address Edit Box:
Enter the host name or IP address of the PSN web site or FTP server that will receive the image file(s). This field should be set to www.seismicnet.com or psn.seismicnet.com for non FTP transfers.
FTP Remote Directory Edit Box:
Enter the directory where WinSDR should place the GIF image file(s). This field is only enabled if the FTP Mode check box is checked. WinSDR will create this directory if needed.
Enable Uploads Check Box:
This is the master On / Off switch. If checked, WinSDR will upload GIF image file(s).
Use FTP Check Box:
If checked, WinSDR will use the FTP protocol to transfer GIF image files.
Passive FTP Mode Check Box:
If checked, WinSDR will use the Passive FTP mode instead of the Active FTP transfer mode.
Upload Interval Select Box:
Controls the upload interval. Possible settings are 10, 15, 30, and 60 minutes.
Upload Channels Check Boxes:
Used to select the channel(s) that will be uploaded to the FTP server or PSN web site.
Ok Button:
Closes the dialog box. New information entered will be used by WinSDR.
Cancel Button:
Closes the dialog box without making any changes.
Help Button:
Opens this documentation.
[Top]
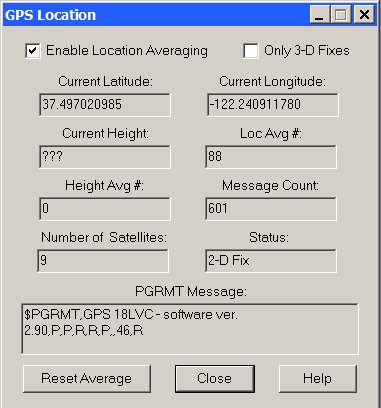
WinSDR can receive both A/D and GPS data from the ADC board. Once enabled, WinSDR will average all 3-D position fixes calculated by the GPS receiver when three or more satellites are being tracked.
Once 100 or more averages have been calculated, the Use GPS Average button in the Channel Setting dialog box will be enabled. If selected, the sensor's latitude, longitude and height information will be updated with the current GPS position average information. To get an accurate location, the user should average the GPS data over a few days.
The PGRMT Message box displays the Garmin GPS 16/18 $PGRMT status message. The message is sent out once per minute and contains data like the firmware version number and other information including the temperature. See the Garmin GPS 16/18 documentation for more information.
Note: This feature should be disabled once the user has determined their stations location to reduce the traffic on the the RS-232 line between the A/D board and WinSDR.
Dialog Controls:
Enable GPS Location Averaging Check Box:
Turns location averaging on or off.
Only 3-D Fixes Check Box:
If enabled, only 3-D fixes will be included in the average.
Reset Average Button:
Resets the location and height averaging numbers.
Close Button:
Closes the dialog box. Averaging will continue until the user turns off GPS location averaging.
Help Button:
Opens this documentation.
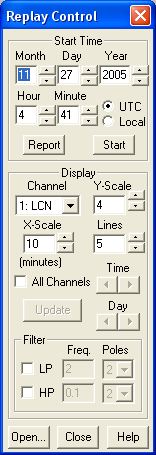
This dialog box is opened with the Replay window when the user enters the Replay mode. The Replay process is used to look for events not automatically saved by WinSDR. If an event is found the user can then save one or more event files.
To start the replay process, the user can either enter a start time in the Start group, import an event report from WinQuake using the Report button or select one of the daily record files using the Open File button. To use the Report button you must use WinQuake (Version 2.8.5 and up) to select an event report in the Event Report dialog box. You must check the Save On Clipboard check box. If you do not see this check box you are running an older version of WinQuake. After selecting an event report, WinQuake will place the report information onto the system clipboard. This information can then be used to seed the Replay start time by pressing the Report button.
After entering the start time information, and pressing the Start button, WinSDR will try and find the time in one of the daily report files. If the time is found, the Replay window will display one or more traces based on the settings below.
The other way of starting the replay process is to open one of the daily record files using the Open File button. This will open the Open File dialog box. Choosing one of the daily record files will start the replay process at the beginning of the record file. The user can then use the scroll-bar in the Replay window or the left-right arrows in the Replay dialog box.
Event files can be created by entering a Save Time in the Save Event dialog box. This dialog box will be opened for you if you enter a start time, or use the Report feature, and then press the Start button. You can also specify an end time and then save the event by double clicking in the Replay window. If you use the Open File button, you will need to select a start time by double clicking in the Replay window. You can then enter a Save Time or double click on the end time in the Replay window.
Start Time Group:
Month Edit Box and Spin Control:
Start time month.
Day Edit Box and Spin Control:
Start time day.
Year Edit Box and Spin Control:
Start time year.
Hour Edit Box and Spin Control:
Start time hour.
Minute Edit Box and Spin Control:
Start time minute.
UTC Check Box:
If checked, the start time is UTC time.
Local Check Box:
If checked, the start time is local time.
Report Button:
Imports a WinQuake event report. Seeds the start time based on the event time. See above for more information.
Start Button:
Starts the replay process at the specified start time.
Display Group:
Channel Select Box:
Selects the channel that will be displayed, if the All Channels check box is not checked, and the Y-Scale edit box will control.
Y-Scale Edit Box and Spin Control:
Controls the Y-Scale of the channel selected by the Channel Select Box.
X-Scale Edit Box and Spin Control:
Controls the X-Scale or time display. Time is in minutes per line per channel.
Lines Edit Box and Spin Control:
Sets the number of lines per channel to display.
All Channels Check Box:
If checked, all channels will be displayed in the Replay window. If not checked, only the channel selected in the Channel select box will be displayed.
Update Button:
After changing one or more items above, you will need to press this button to update the Replay window with the new setting(s).
Time Spin Control:
Scrolls the Replay window left or right.
Day Spin Control:
Opens the previous or next day's record file.
Digital Filter Group Box:
LP (Lowpass) Check Box:
Enables lowpass filtering of the data displayed in the Replay window for the selected channel.
Lowpass Frequency Edit Box:
Sets the lowpass filter cutoff frequency.
Lowpass Poles:
Sets the number of poles, or the steepness of the filter, used to attenuate the incoming data.
HP (Highpass) Check Box:
Enables highpass filtering of the data displayed in the Replay window for the selected channel.
Highpass Frequency Edit Box:
Sets the highpass filter cutoff frequency.
Highpass Poles:
Sets the number of poles, or the steepness of the filter, used to attenuate the incoming data.
Open Button:
Opens the Open File dialog box. This dialog box is used to select one of the daily record files to start the Replay process.
Close Button:
Closes the dialog box.
Help Button:
Opens this documentation.
[Top]
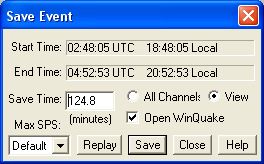
This dialog box is used to save PSN formatted event files that can be viewed and analyzed with WinQuake. This dialog box is activated when the user selects an event start time by using the mouse and double clicking in the Real-time or Replay windows. When the user double clicks again at the event end time, or specifies a save time, the user can save the event file(s) by pressing the Save button. The location of the saved event files is based on the Event Files field in the System Settings dialog box and the time of the event file. A subdirectory located under the Event Files directory will be created if need based on the year and month (YYMM) of the event file. Example: If the Event Files directory is set to d:\events\ and if the event file(s) is created on 12/26/2004, then the file(s) will be located in a directory named d:\events\0412\.
The Save Event dialog box has two other features. It can control the sample rate of the event file(s) being saved, and open the Replay window from the Real-time window or zoom into the data from the Replay window.
Start Time Display:
Displays the current selected event start time. Both UTC and local time are displayed.
End Time Display:
Displays the current selected event end time. Both UTC and local time are displayed.
Save Time Edit Box:
Displays the time difference between the start and end times. The user can also specify a save time by entering the number of minutes to save in this edit box.
All Channels Check Box:
If check, all channels will be saved.
View Check Box:
If check, only the channel being displayed will be saved.
Open WinQuake Check box:
If checked, WinSDR will open WinQuake after saving the event file(s). If one event file is saved, WinQuake will display the new file. If more then one event file is saved, WinQuake will display the Open File dialog box listing the new event files. To use this feature you must first use the Locate WinQuake dialog box to locate the WINQK32.EXE file. This is usually located in this directory:
c:\program files\winquake\
To open this dialog box use the File / WinQuake Location menu items.
Max SPS List Box:
Controls the sample rate of the event file(s). In the Default mode, the sample rate of the event file will be set by the sample rate of system divided by any Save-Nth number specified in the Channel Setting screen. If you select a sample rate, the event file(s) will be forced to the value selected in the list box.
Replay / Zoom Button:
If the Save Event dialog box is opened from the Real-time window, the button will be labeled "Replay". When selected, the Replay window will be opened with the Start Time displayed in the Replay window. If this dialog is opened from the Replay window the button will be labeled "Zoom". Then selected, the Replay window will view the data specified by the Start and End Times.
Save Button:
When pressed, WinSDR will save the event file(s) based on the start and end times or user supplied save time.
Close Button:
Closes the dialog box without saving any event file(s).
Help Button:
Opens this documentation.
[Top]
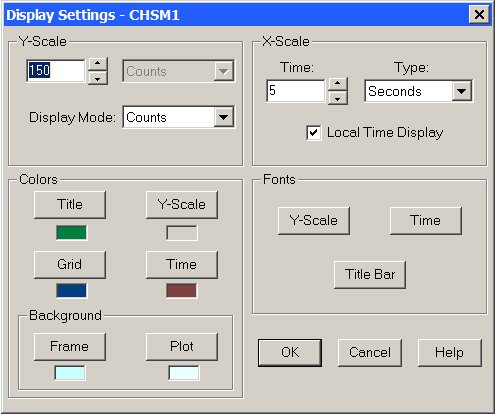
This dialog box controls the Single Line Display window. To open the this window use the View / Single Line Display menu items.
Y-Scale Group:
Edit Box, Spin Control and Select Box:
Used to control the Y-Scale value.
Display Mode Select Box:
Used to set the display mode. Current modes are ADC counts, ADC input voltage or Amplifier input volts.
X-Scale Group:
Time Edit Box:
Used to control the control time. Enter the number of seconds, minutes or hours to display across the Single Line plot.
Type List Box:
Used to set the X-Scale time to seconds, minutes or hours.
Local Time Display:
If selected, local time will be displayed instead of UTC/GMT time.
Colors Group:
Title Button:
Opens the Colors dialog box. This dialog box is used to change the color of the title of the display.
Y-Scale Button:
Opens the Colors dialog box. This dialog box is used to change the color of the Y-Scale text.
Grid Button:
Opens the Colors dialog box. This dialog box is used to change the color of the plot grid lines.
Time:
Opens the Colors dialog box. This dialog box is used to change the color of the time or X-Scale text.
Frame:
Opens the Colors dialog box. This dialog box is used to change the color of the frame around the plot window.
Plot:
Opens the Colors dialog box. This dialog box is used to change the color of the plot.
Fronts:
Y-Scale Button:
Opens the Fonts dialog box. This dialog box is used to change the font of the Y-Scale text.
Time Button:
Opens the Fonts dialog box. This dialog box is used to change the font of the Time or X-Scale text.
Title Bar Button:
Opens the Fonts dialog box. This dialog box is used to change the font of the plot title bar.
Ok Button:
Closes the dialog box. New information entered will be used by WinSDR.
Cancel Button:
Closes the dialog box without making any changes.
Help Button:
Opens this documentation.
[Top]
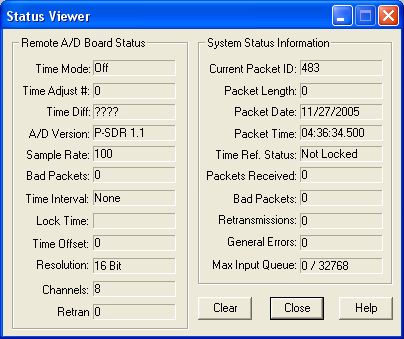
This dialog box displays WinSDR and the remote A/D board status information. The Status View is opened using the View / Status Viewer menu items. The fields are update once per second as the data from the A/D board is received by WinSDR.
Remote A/D Board Status:
Time Mode:
Displays the current time interval mode. This can be either Add Time, Drop Time or None. None indicates that no time interval has been calculated yet by WinSDR.
Interval:
Time interval between 1 millisecond adjustments to the internal time of the A/D board to keep it near GPS or WWV time.
Adjust #:
Number of 1 milliseconds adjustments made to the internal A/D board time to keep it near GPS or WWV time.
Lock Time:
The time in days, hours and minutes that the remote A/D board has been locked to one of the timing references source (GPS, WWV etc).
Time Diff:
This is the time difference in milliseconds between the internal time of the A/D board and GPS or WWV time.
Time Offset:
Time offset in milliseconds. Used to fine tune the timing accuracy of WinSDR. This value should match the Reference Offset number in the System Settings dialog box.
Version:
This field displays the firmware version number of either the Serial Out A/D board or the VolksMeter Interface board program.
Resolution:
Number of A/D bits used to record the analog data.
SPS:
The sample rate the remote A/D board is using to record the analog data. This value should match the Samples Per Second number in the System Settings dialog box.
Channels:
Number of channels the remote A/D board is recording. This value should match the Channels To Record number in the System Settings dialog box.
Bad Packets:
Number of bad packets received by the remote A/D board.
Retran Errs:
Number of times the remote A/D board sent out retransmission packets.
General Status Information:
Current Packet ID:
Displays the current packet ID. Each packet from the A/D board has a unique packet ID.
Packet Length:
Length in bytes of the current packet.
Packet Date:
Displays the date time stamp of the current packet.
Packet Time:
Displays the time of day of the current packet.
Time Ref. Status:
Displays the time reference lock status. This field can be "Not Locked" indicating the A/D board is not locked to one of the time references, "Locked" indicates the internal time of the A/D board is within a few milliseconds of UTC time. "Was Locked" indicates that at some time the system was locked to a time reference source but it has been over 12 hours since the system has been locked to the time reference.
Packets Received:
Number of packets received by WinSDR from the A/D board or VolksMeter Interface board.
Bad Packets:
Number of bad packets received by WinSDR. Each packet from the A/D board includes a checksum byte. WinSDR uses this checksum to verify the integrity of the data received from the A/D board. If a packet is bad, WinSDR will request that the A/D board resend the packet.
Retransmissions:
Number of retransmissions requested by WinSDR. If WinSDR receives a bad packet it will request that the A/D board retransmit the packet again.
General Errors:
Number of general errors encountered by WinSDR.
Max. Input Queue:
This field displays the maximum bytes that were saved in the serial port input queue by the system. WinSDR opens the serial port with input queue size of 32768 bytes. If the max queue number gets near this number your system is too busy doing other things and WinSDR is not getting enough CPU time to read the data from the serial port.
Clear Button:
Clears or resets the following fields: Packets Received, Bad Packets, Retransmissions, General Errors and the Max. Input Queue.
Close Button:
Closes the Status Viewer dialog box.
Help Button:
Opens this documentation.
[Top]
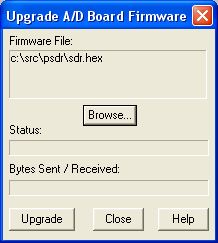
This dialog box is used to upgrade the firmware on the ADC board. See the Upgrade Firmware page for more information.
[Top]
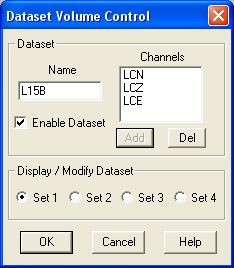
Dataset volumes contain data from two or channels in one event file. The format of the dataset file is documented here.
The Dataset Volume dialog box is used to control what channels are saved in dataset files. This dialog box is opened using the File / Dataset Volume Control menu items. Up to four datasets can be defined and each dataset can have two or three channels associated with the dataset.
The Name Edit box is used to enter the dataset name. This is used as the file extension when WinSDR creates the dataset file name. The format of the file name is the event file start time, dataset name and then "PSN". Example: 030208.123023.LCL15B.PSN
The Channels list box lists the channels associated with the dataset.
The Enable Dataset checkbox is used to enable or disable the dataset volume. If enabled, WinSDR will save the channels in the dataset volume. If turned off, the channels will be saved as individual event files.
The Add button opens the Add Channel dialog box. This dialog box lists the available channels that can be added to the dataset. Up to three channels can be added to the dataset list.
The Del button is used to delete the currently selected channel in the Channels list box.
The Sel 1 to Sel 4 radio buttons are used to display and modify one of the four dataset volumes that can be created in WinSDR.
[Top]