Main Control Dialog Box:
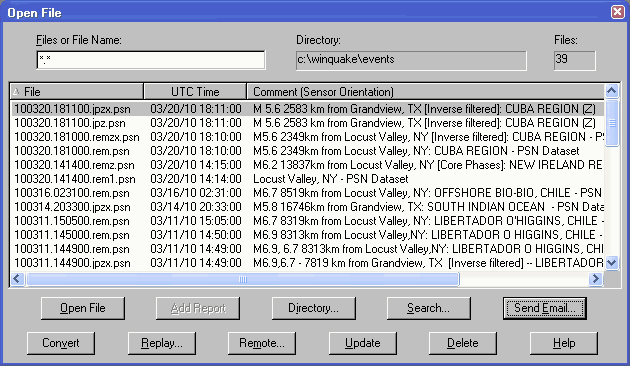
Main control dialog box for WinQuake. Used to open or delete event files, open the
WinSDR /
SDR Replay dialog box, change the
working directory, or add event report information to the selected event file(s). You can
also send the selected file(s) as an email message and convert files from the
old PSN Type 3 format
to the new Type 4
format.
Files or File Name Edit Box:
Controls the File List box. Normally this string is set at *.* so all event files and
dataset volumes will be displayed. You can change this string to show only one station's
sensor event files by entering *. and the station ID file extension. Example: *.LC1.PSN will
show a list of all LC1 files in the current selected directory.
Directory Text:
Displays the currently selected directory. Use the Change Directory button, or one of
the directories listed under the File menu, to change the currently selected directory.
List Box:
Shows a list of event files that can be opened. To open an event file or display the
contents of a SEED or PEPP dataset volume's event files, double click on the file name
line in the List box. See below for more information about using the List box.
Up / Down Control:
Used to control the the direction, either newer files on top or bottom, of the list
box.
Open File Button:
Open selected event file(s) or display the event files within a PEPP or SEED dataset
volume. More then one event file can be selected by holding down on the Ctrl
key and clicking on the event file name.
Add Event Report Button:
Used to add event report information to the selected PSN event file(s). This button
will be dimmed if no event report information has been selected. Use the Event Report dialog box to select an event report.
If the selected event file already has an event report, you will be asked if
you want to replace or add a new event report to the event file. See
Using the Event Report Feature documentation for more information.
Directory Button:
Opens the change Directory dialog box. Used to
select the directory where WinQuake will look for event and dataset volume files. After
selecting a new directory, WinQuake will reread all of the files in the new directory
looking for PSN, SAC, PEPP or SEED volumes. The new list of files will be displayed in the
List box. If you set the Save as Default check box, in the Directory dialog box,
the new or current directory will become the new default. WinQuake uses the default
directory as a starting directory when the program first starts up. As you change
directories the File menu will show a list of up to 8 directories.
Search Button:
Opens the Search Dialog Box. Used to search for event
files on your hard disk.
Send Email Message Button:
Opens the Send E-Mail dialog box. Used to send the
selected event file(s) as email attachments. This button will be dimmed if more than 4
event files are selected in the List box.
Convert Button:
Opens the Convert File dialog box. This dialog box is used to convert the
selected file(s) to the new PSN Type 4 format or change the file name to a
long PSN file name.
Replay Button:
Opens the Replay dialog box. The Replay feature is
used to create event files using WinSDR or SDR over a network. This button is dimmed if the file
REPLAY.DAT is not located in the WinQuake root directory when WinQuake first starts up. To
create a REPLAY.DAT file use the Replay Settings item under the File menu.
Remote Button:
Opens the Remote File Request dialog box. The
Remote File Request feature is
used to send e-mail requests to PSN stations for event files and station
information. See the Remote File Request documentation for more information
on using this feature.
Update / All Files Button:
This button has two purposes. Normally the button is called Update and is used to
update or refresh the List box by reloading all of the files in the currently selected
directory. The name of the button will change to All Files when the contents of a SEED or
PEPP dataset volume are being displayed. Selecting the All Files button will redisplay
the list of event and dataset volume files.
Delete File Button:
Deletes selected file(s). You will be prompted with a Delete File dialog box before
files are deleted.
Help Button:
Opens this documentation.
Additional Information:
The file list box allows for multiple file selection. The Send Email Message, Open File, Add
Event Report, Delete and Convert functions can use more than one file for their operation. To
select more than one file, hold down the left mouse button and move it up or down. You can
also hold down the Ctrl key and select individual files by clicking on the file name.
Double clicking on the file name can also open an event file.
Only one SEED or PEPP volume set file can be opened. You will receive an error
if you try to display the contents of more then one volume set or if you select an event file and a
volume set file.
[Top]
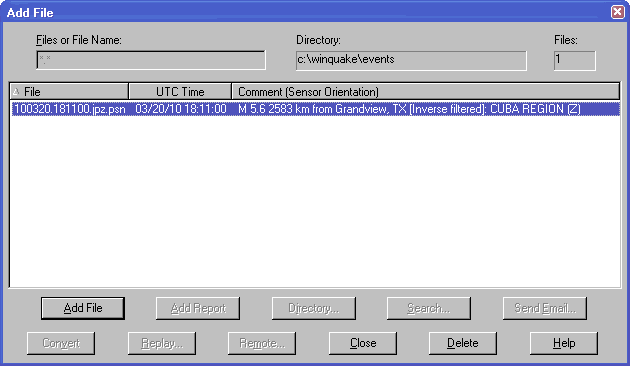
Used to add one or two more files or records to the current Event Window. This is used to display
the data from a two or three component sensor in one Event Window. When selected, the Add File dialog
box will be opened so that the user can select the file or files. Only event files that have the
same start time, sample count, sample rate and sensor type (displacement, velocity or accelerometer),
and different sensor I.D. or sensor name, can be added to the current Event Window.
Refer to Open File for description of controls.
[Top]
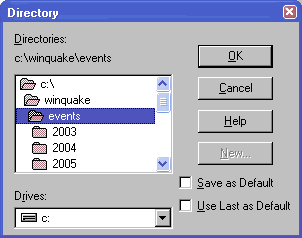
This dialog box is used to change or create a new directory.
Directory Text:
Displays currently selected directory.
Directory List Box:
Displays a list of directories based on the currently selected drive (see below). To
select a directory, double click on one of the directory names.
Drives Select Box:
Used to select the disk drive used by the Directory List box.
OK Button:
Close dialog box and use directory.
Cancel Button:
Close dialog box without using directory.
Help Button:
Opens this documentation.
New Button:
Used to create a new directory. See New Directory
dialog box for more information. This button maybe dimmed for some program functions.
Save as Default Check Box:
When checked, the selected directory will be used as the default directory for new
program functions and when WinQuake is first started. This Check box maybe dimmed for some
program functions.
[Top]
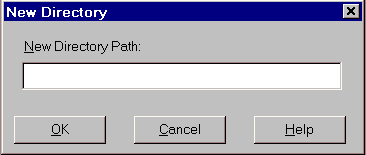
This dialog box is used to create a new directory.
New Directory Path Edit Box:
Enter the directory name to create.
OK Button:
Close dialog box and create new directory.
Cancel Button:
Close dialog box without creating directory.
Help Button:
Opens this documentation.
[Top]
WinSDR / SDR Replay Dialog Box
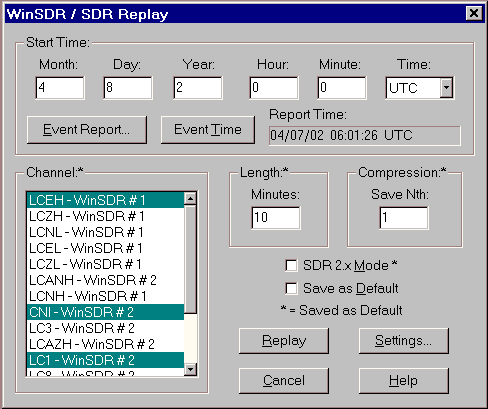
This dialog box is used to create and display an event file by using WinSDR or SDR (Seismic Data Recorder) Replay
feature over a Local Area Network.
Start Time Month / Day / Year / Hour/ Minute Edit Boxes:
Enter the event file start time.
Start Time Select Box:
Select UTC or Local Time for the event file start time.
Event Report Button:
Opens the Event Report dialog box so that a event
report time can be used for the event file start time.
Event Time Button:
Enters the currently selected event report time, minus two minutes, in the Start Time
Edit boxes. This button will be dimmed if no event report is currently selected.
Event Report Time Text:
Displays the currently selected event report time.
Length Edit Box:
Enter the Length, in minutes, of the event file.
Channel Select Box:
Select one or more channels to Replay.
Compression Edit Box:
Used to compress the size of the event file by reducing the sample rate. A Save Nth
value of one saves every data point. A value of two saves every other data point reducing
the file size by 1/2 and lowering the sample rate by 1/2. A value of three saves very
third data point etc.
SDR 2.X Mode:
Checked this box if you are using SDR version 2.x.
Save as Default Check Box:
If checked, saves the Length, WinSDR or SDR Channel, and Compression settings to the WinQuake INI
file. These settings will be used as the default settings when the Replay dialog box is
used again.
Replay Button:
Start WinSDR / SDR Replay to create an event file. If successful, the dialog box will close and
a new event window will be opened with the newly created event file.
Settings Button:
Opens the Replay Settings dialog box.
Close Button:
Close the dialog box.
Help Button:
Opens this documentation.
[Top]
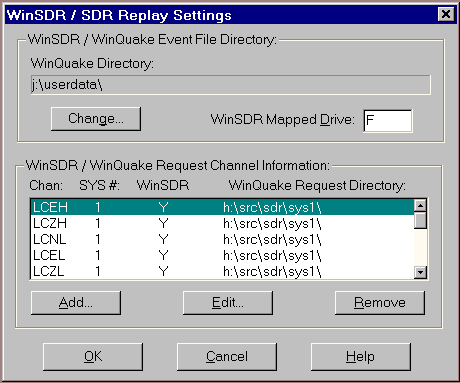
This dialog box is used to control the settings needed for the WinSDR or SDR Replay feature.
WinSDR / WinQuake Event File Directory Group
WinQuake Directory Text:
Displays currently selected drive and directory where WinSDR or SDR will place
event files.
Change Button:
Opens the Directory dialog box. Used to select the
drive and directory where WinSDR or SDR will place event files.
WinSDR Mapped Drive Edit Box:
Enter the mapped drive letter used by the WinSDR or SDR system to share files on your main
Windows system. See the SDR documentation on how to setup SDR to work over a Local Area
Network.
WinSDR / WinQuake Request Channel Information Group
Channel Information List Box:
Displays the the current channel information.
Add Button:
Opens the Replay Channel Information dialog
box. Replay Channel information entered in the dialog box will be added to the
WinSDR / WinQuake Request Channel Information list box.
Edit Button:
Uses the Replay Channel Information dialog box
to edit the currently selected item in the WinSDR / WinQuake Request Channel Information list box.
Remove Button:
Removes the currently selected item in the WinSDR / WinQuake Request Channel Information list box.
OK Button:
Close dialog box using the new settings.
Cancel Button:
Close dialog box without using any new settings.
Help Button:
Opens this documentation.
Additional Information:
Settings are saved in the file REPLAY.DAT.
[Top]

This dialog box is used to add or modify WinSDR or SDR event file request channel information.
Event File Extension Edit Box:
Enter the 2 to 6 (3 maximum for SDR) letter channel Event File Extension identifier.
System Number Edit Box:
Enter the WinSDR or SDR System Number. This setting should be set to "1" if you have one
WinSDR or SDR system. Range: 1 to 10
WinQuake Request Directory Change Button:
Opens the Directory dialog box. Used to select or
create a directory that will be used for request file sharing between WinQuake and WinSDR or SDR.
WinSDR Mode:
Check this check box if you are using WinSDR.
OK Button:
Close dialog box and use new channel information.
Cancel Button:
Close dialog box without using channel information.
Help Button:
Opens this documentation.
[Top]
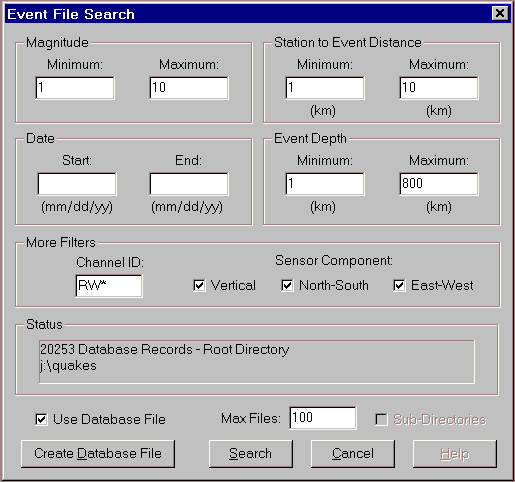
This dialog box is used to search for event files using
filters like event magnitude, distance to the event etc. This dialog box is
opened using the Search button in the main Open
File dialog box. There are two ways of searching for event files. One is
using a database file created using the Create Database File button or
searching the actual directly and option sub-directories for event files.
This method can take a very long time depending on the number of files
WinQuake needs to open to see if it is a valid event file and that it matches
the filter parameters. The directory searched is the directory selected by the
Open File dialog box. Any sub-directories located in the root directory will
be searched if the Sub-Directory check box is checked.
If you have a lot of event files on your system you can use
the database file option to reduce the time needed to search of the files on
your system. First you must create the database file using the Create
Database File button. Use the next dialog box to select the root directory
or drive letter containing your event files. WinQuake will then create the
database file by looking for event files in the root directory and in any
sub-directories. Note, the filter parameters are not used while looking for
event files to add to the database file. The EVENTDB.DAT database file created
by WinQuake is a standard ASCII text file that can be opened with any text
editor. The file is located in the root WinQuake directory or folder.
Once you have a database file you can search for events using
the filter parameters. To search the database file, check the Use Database
File check box, enter any filter parameters and press the Search
button. The maximum number of files returned by the search in either mode
(direct search or database file) is control by the Max Files edit box. When
the program completes the search, or if the maximum files has been reached,
the Search dialog box will be closed and the Open File dialog box will display
the search results. To redisplay the normal list of files either press the Update
button, select another directory using the Directory button
or the File menu directory list.
Additional Information:
The database file has the following format:
-
Number of event file records
-
Database version number
-
Root directory that was used to search for event files
-
Event file information
Each event file line has the following format. Comas are used
to separate each field.
-
Directory and filename
-
Event file start date and time
-
Channel/Sensor ID
-
Component letter - N = N-S orientation sensor, E = E-W, Z
= Vertical, ? = Unknown
-
Magnitude of the event or 0 if no event information is
included in the event file
-
Station to event distance in km or 0 if no event
information is included in the event file
-
Event depth in km or 0 if no event information is included
in the event file
-
Carriage/Line Feed characters
Below is an example of the first five lines of a database
file:
Records: 020253
Version: 1.0
Root: j:\quakes
j:\quakes\0001\000102a.bhz.gumo.psn,01/02/2000 12:58:17,GUMO,Z,5.6,5489,33
j:\quakes\0001\000101a.gr2.psn,01/01/2000 01:20:23,GR2,Z,0,0,0
Notes:
1: Currently there is no way of aborting a direct search or database file
creation except to stop the WinQuake process using the Task Manager.
2: The database file can contain the same event file more then once if the
file contains more then one event report.
[Top]
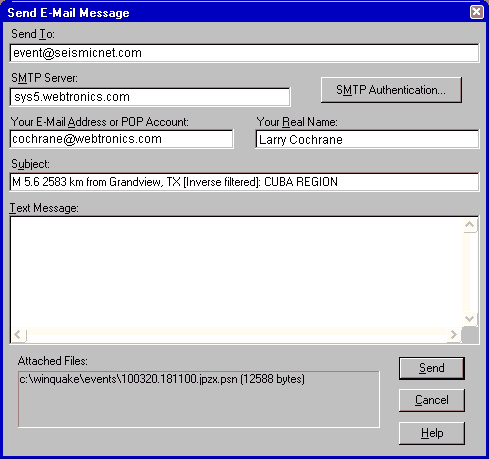
This dialog box is used to send up to 4 event files, or SEED/PEPP data volume sets, in
an E-Mail message. The files are sent as a MIME attachment. This feature can be used to
send event files to the PSN Event Archive system at psnevent@seismicnet.com or
psnevent@webtronics.com.
Send To Edit Box:
Enter one or more E-Mail addresses to send the file(s) to. E-Mail addresses should be
separated by a comma. This string is saved in the EMAIL.DAT file
Input Example: event@seismicnet.com , John Smith <jsmith@somehost.com>
SMTP Host Edit Box:
Holds your Internet Service Provider's SMTP host name. This string is saved in the
EMAIL.DAT file.
Input Example: mail.myisp.com
SMTP Authentication Button:
Opens the SMTP Authentication dialog box. Some ISP require user authentication
to use their SMTP server. If authentication is required, use the SMTP Authentication
dialog box to specify the authentication type, user name and password.
Authentication information is saved in the
EMAIL.DAT file.
Your Real Name Edit Box:
Enter your real name. This string is used as part of the From: field of your message
and the default Subject: line. This string is saved in the EMAIL.DAT file.
Your E-Mail Address or POP Account Edit Box:
Enter your return E-Mail address. Some SMTP Host servers may require that this address
be the same as your POP account address. This string is saved in the EMAIL.DAT file.
Input Example: someone@ahost.com
SMTP Host Edit Box:
Holds your Internet Service Provider's SMTP host name. This string is saved in the
EMAIL.DAT file.
Input Example: mail.netcom.com
Subject Edit Box:
Subject line of the E-Mail message.
Text Message Edit Box:
Enter text to send with the E-Mail message. This is optional.
Attached Files Text:
Displays the file name(s), and file size in bytes, that will be sent in the E-Mail message.
Send Button:
Send file(s) using E-Mail message.
Cancel Button:
Close dialog box without sending file(s).
Help Button:
Opens this documentation.
[Top]
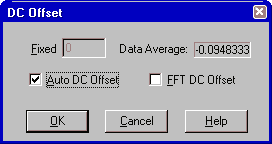
This dialog box is used to compensate for any DC offset in the dataset by applying an offset to the data
displayed in an event window.
Current Edit Box:
Changes the current DC offset value used when displaying the current event file. If the
dataset has an average DC offset of 30 then a value of -30 will re-center the display
around zero. Range: +/- 32,000
Data Average Text:
Displays the average of the dataset.
Auto DC Offset Check Box:
When checked, WinQuake will apply the DC offset needed to center a dataset around zero
when the event file is first opened or when changes are made to the dataset. This setting
is saved in the WinQuake INI file.
OK Button:
Close dialog box and use new settings.
Cancel Button:
Close dialog box without using new settings.
Help Button:
Opens this documentation.
[Top]
Great Circle Distance Calculator Dialog Box
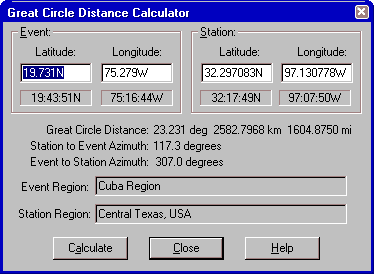
This dialog box is used to calculate the distance and azimuth between two points on the earth.
Event Latitude Edit Box:
Enter event latitude. Range: +/-90.0, 0 to 90.0N or 0 to 90.0S
Event Longitude Edit Box:
Enter event longitude. Range: +/-180.0, 0 to 180.0E or 0 to 180.0W
Station Latitude Edit Box:
Enter station latitude. Range: +/-90.0, 0 to 90.0N or 0 to 90.0S
Station Longitude Edit Box:
Enter station longitude. Range: +/-180.0, 0 to 180.0E or 0 to 180.0W
Calculate Button:
Calculate distance and azimuth.
Close Button:
Close dialog box.
Help Button:
Opens this documentation.
Additional Information:
The data under each of the edit boxes displays the latitude or longitude in the
degree:minute:second format.
The latitude can be entered as a plus or minus number or end with an N or S. A positive
number, or the N character, represents the Northern Hemisphere and a negative number, or S
character, the Southern. The latitude can be entered in either degrees and a fraction of
degree (DD.FFF) or in degree, minute, second and fraction of a second (DD:MM:SS.FFF).
The longitude can be entered as a plus or minus number or end with an E or W. A
positive number, or the E character, represents the Eastern Hemisphere and a negative
number, or W character, the Western. The latitude can be entered in either degrees and a
fraction of degree (DDD.FFF) or in degree, minute, second and fraction of a second
(DDD:MM:SS.FFF).
[Top]
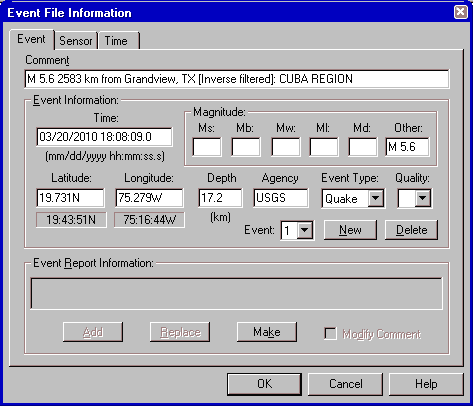
This dialog box is used to modify or add event information to the event
file. More then one event can be entered by using the New button.
Event Information Group:
Comment Edit Box:
Enter the event comment string here.
Time Edit Box:
Enter the event start time here. The time is entered in this format:
MO/DD/YY HH:MM:SS.T where MO = Month, DD = Day, YY = Year, HH = hours, MM = minutes, and SS.S =
seconds.
Latitude Edit Box:
Enter the event latitude here. See below on entering latitude numbers.
Longitude Edit Box:
Enter event longitude. See below on entering longitude numbers.
Magnitude Edit Boxes:
Enter the magnitude of the event in one or more of the edit boxes.
Depth Edit Box:
Enter event depth in kilometers.
Agency Edit Box:
Enter the reporting agency in this edit box. Example: NEIC
Event Type Select Box:
Select one of the following event types: Quake, Nuclear, Quarry or Other
Quality Select Box:
Select the event location quality character here. Can be blank or A through E, with A being
the best event location quality.
Event Number Select Box:
Used to select the event that will be displayed, modified or deleted.
New Button:
Saves the current information and clears the fields so that the next event can be entered.
Delete Button:
Deletes the current event information.
Event Report Information Group:
Event Report Text Box:
Displays the current event report. Use the Event Report dialog
box to select an event report.
Add Button:
Adds the event report information to the event file. This button will be dimmed if no event
report is currently selected. Use the Event Report dialog
box to select an event report. This button can be used to add additional
events to the event file. Use the replace button to update the current
select event information.
Replace Button:
Used to replace the current selected event information with new report information.
Make Button:
Makes a event report based on the event information entered above. This button will be enabled when
there is valid event latitude, longitude and time information.
Modify Comment Check Box:
Used when the Add Event Report feature is used. If checked, the comment will be
modify with a standard comment string based on the event and station information.
OK Button:
Close dialog box and use new information.
Cancel Button:
Close dialog box without using new information.
Help Button:
Opens this documentation.
Additional Information:
The text under each of the latitude and longitude edit boxes displays the latitude or
longitude in the degree:minute:second format.
The latitude of the event can be entered as a plus or minus number or end
with an N or S. A positive number, or the N character, represents the Northern Hemisphere
and a negative number, or S character, the Southern. The latitude can be entered in either
degrees and a fraction of degree (DD.FFF) or in degree, minute, second and fraction of a
second (DD:MM:SS.FFF).
The longitude of the event can be entered as a plus or minus number or end
with an E or W. A positive number, or the E character, represents the Eastern Hemisphere
and a negative number, or W character, the Western. The latitude can be entered in either
degrees and a fraction of degree (DDD.FFF) or in degree, minute, second and fraction of a
second (DDD:MM:SS.FFF).
Note: The Comment strings will not be saved if the event file is saved
as an SAC Binary file.
[Top]
Event File Information Dialog Box - Sensor
Tab
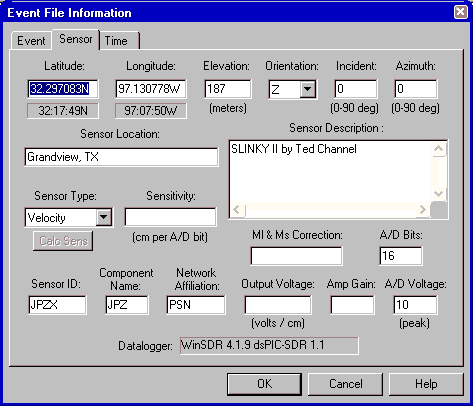
This dialog box is used to add or modify information about the sensor used to record
the event. Normally this information is add to the event file by the datalogger.
Latitude Edit Box:
Enter sensor latitude. See below on entering latitude numbers.
Longitude Edit Box:
Enter sensor longitude. See below on entering longitude numbers.
Elevation Edit Box:
Elevation of the sensor in meters above or below (negative number) sea level.
Leave blank if unknown.
Orientation Select Box:
Set to Z for a vertical sensor, N-S for a North-South
oriented sensor, E-W for a East-West sensor or ? if unknown.
Incident Edit Box:
Sensor incident angle in degrees with respect to vertical. For a N-S or E-W
sensor use 90. For a vertical sensor use 0. Leave blank if unknown.
Azimuth Edit Box:
Sensor azimuth angle in degrees with respect
to the north through east. For a N-S or vertical sensor use 0. For a E-W
sensor use 90. Leave blank if unknown.
Sensor Location Edit Box:
The sensor location string. Example: Redwood City, CA USA
Sensor Description Edit Box:
The sensor information string. Example: 12 Second Lehman or Geospace HS10 1Hz Geophone
Sensor Type Select Box:
Select the sensor output type to either Acceleration, Velocity,
Displacement or Unknown.
Sensitivity:
The sensitivity of the sensor if known. See below for more information.
Sensor ID:
The sensor ID string and event file extension from this
channel. The sensor ID string should be 3 to 6 characters long.
Component Name:
The sensor component name used to describe the sensor. Example: BHZ or SHN
Network Affiliation:
The sensor's network affiliation. Example: PSN
WinQuake Ml & Ms Correction:
Enter the correction number used for Ml and Ms magnitude calculation.
A/D Bits Edit Box:
Enter the number of A/D converter bits.
Datalogger Text:
Displays the datalogger program name and version number.
OK Button:
Close dialog box and update sensor information in the event file.
Cancel Button:
Close the dialog box without making any changes to the event file.
Help Button:
Opens this documentation.
Additional Information:
The latitude of the sensor can be entered as a plus or minus number or end
with an N or S. A positive number, or the N character, represents the Northern Hemisphere
and a negative number, or S character, the Southern. The latitude can be entered in either
degrees and a fraction of degree (DD.FFF) or in degree, minute, second and fraction of a
second (DD:MM:SS.FFF).
The longitude of the sensor can be entered as a plus or minus number or end
with an E or W. A positive number, or the E character, represents the Eastern Hemisphere
and a negative number, or W character, the Western. The latitude can be entered in either
degrees and a fraction of degree (DDD.FFF) or in degree, minute, second and fraction of a
second (DDD:MM:SS.FFF).
The Sensor Sensitivity field number depends on the Sensor Output Type
field. If the sensor output is acceleration, sensitivity is in cm/sec/sec per
A/D bit, if the output is velocity cm/sec per bit and if the output is
displacement in cm per bit. This web
page can be used to calculate the sensitivity number if you know the
output voltage level of your sensor.
[Top]
Event File Information Dialog Box - Time
Tab
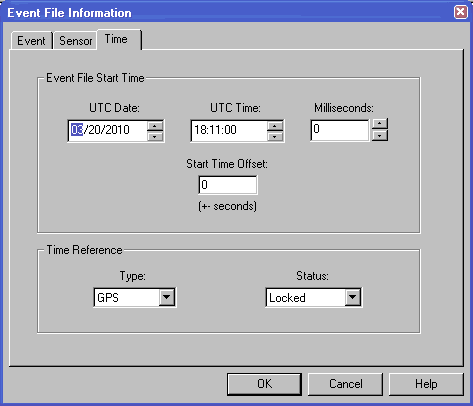
This dialog box is used to adjust various time information in the event file.
It can be used to adjust the start time, start time offset and the time
reference information in the header section of the event file being displayed.
Adjust Start Time Button:
Opens the Time Correction dialog box. In this dialog box you enter the number of
seconds to add or subtract to or from the start time of the event
file. Offset time can also be entered in hour:minute:second format.
Start Time Offset Edit Box:
Used to change the Start Time Offset field in the PSN Type 4 event
file header. See the PSN
Type 4 documentation for more information.
Time Reference Select Box:
Used to select or clear the Time Reference type used for datalogger time
keeping. Can be one of the following: None, GPS, WWV, WWVB or Other.
Reference Status Select Box:
Used to select or clear the time reference status. Can be one of the
following: Not Locked, Was Locked or Locked.
OK Button:
Close dialog box and update the event file with the new time information.
Cancel Button:
Close dialog box without updating the event file time information.
Help Button:
Opens this documentation.
[Top]
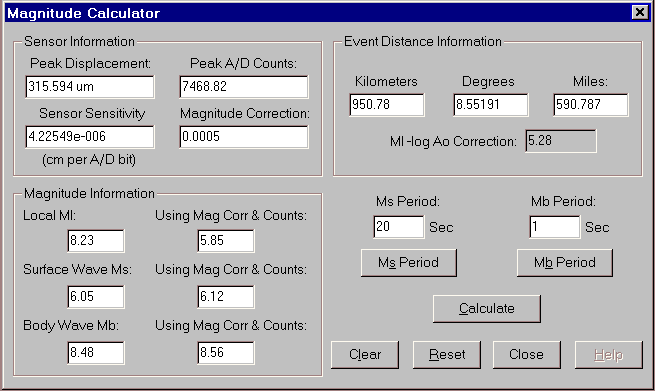
The Magnitude Calculator dialog box can be used to calculate
the following information:
-
Calculate display Ml, Ms and Mb magnitudes based on Peak
Displacement and Event Distance
-
Calculate the magnitude based on the sensor Magnitude
Correction factor and Peak A/D Counts
-
Calculate the Peak Displacement based on the event
magnitude and station to event distance
-
Calculate the sensor Magnitude Correction number
based on Peak A/D Counts and event magnitude
Sensor Information Group:
Peak Displacement Edit Box:
This edit box contains the Peak Displacement
number. When the dialog box is first opened, and if the event window is
displaying displacement data and the Sensor Sensitivity is known,
WinQuake will fill in this field from the event window used to open the
dialog box. The number is calculated based on the Sensor Sensitivity
number in the event file header and the Peak A/D Counts.
This edit box will be updated if the Ml, Ms, or Mb
magnitude is changed. The calculation will be based on the new magnitude
and the current event to station distance.
Peak A/D Counts Edit Box:
The A/D counts number is set to the peak counts in the
event window view (not the whole event file) or the location of the Mb or
Ml / Ms magnitude marker when the dialog box is first open.
Sensor Sensitivity Edit Box:
This edit box contains the sensor sensitivity number, if
available in the event file header. This number can be calculated based on
peak displacement and A/D counts or event magnitude, peak displacement and
peak A/D counts.
Magnitude Correction Edit Box:
This edit box contains the sensor Magnitude Correction
number, if available in the event file header. This number can be
calculated based on event magnitude and peak A/D counts.
Event Distance Information Group:
Then the dialog box is first opened, WinQuake will fill in
these fields from the current event to station distance based on the
location of the P and S markers in the event window used to open the dialog
box. If one of the Event Distance edit boxes is modified the other edit
boxes will be updated with the new distance information.
The Ml -log A0 Correction number displays the current
Ml correction number based on the station to event distance. This is the
formula used to calculate Ml magnitude:
Ml = log(A) + A0_Correction where A = displacement in
millimeters.
Magnitude Information:
This group displays the Ml, Mb and Ms magnitudes based on
the Sensor Sensitivity number, peak A/D counts and event to station distance
or Magnitude Correction number, peak A/D Counts, and distance. The Ml, Mb
and Ms edit boxes on the left are based on the Sensor Sensitivity number and
the boxes on the right display the magnitudes based on the Magnitude
Correction number.
Mb and Ms Period Edit Boxes and Buttons:
These edit boxes and corresponding buttons control the
period used for MS and Mb magnitude calculation. The period can be enter
manually using the edit boxes or calculated using the Ms or Mb Period
button. See How WinQuake Calculates Magnitude
for more information.
Calculate Button:
When this button is pressed, WinQuake will recalculate any
fields it can based on the information supplied by the user.
Clear Button:
Clears all of the edit boxes.
Reset Button:
Resets all of the fields to their initial value.
Close Button:
Closes the dialog box.
Help Button:
Opens the help page for the dialog box.
[Top]
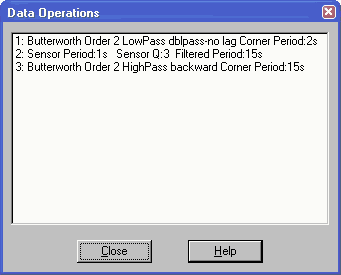
This dialog box is used to display information on what filters
have been applied to the dataset and if the dataset has been integrated.
Close Button:
Close dialog box.
Help Button:
Opens this documentation.
Additional Information:
The filter abbreviations are:
IIR Filter = Time domain filter using a IIR (Infinite Impulse
Response) digital filter
FFT Filter = Filtering using the FFT window
BW = Butterworth filter
HP = High-pass filter
LP = Low-pass filter
Sensor Period = Period Extender Filter
Freq: = Filter cutoff frequency
Poles: = Filter poles or how quickly the filter attenuates the signal
[Top]
STA/LTA Ratio Dialog Box
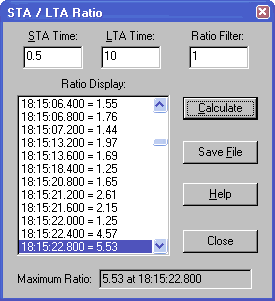
This dialog box is used to display STA (Short Term Averaging) / LTA (Long Term Averaging)
ratio information of the current selected event window. This information can be used to help set the event trigger information
in WinSDR or SDR.
Please see the STA/LTA
WinSDR documentation for more information on STA/LTA event triggering. This dialog box is modeless, meaning
that you can do other things within WinQuake while this dialog box is open.
STA Time Edit Box:
Enter the Short Term Average time in seconds. Fractions of a
second may be entered.
LTA Time Edit Box:
Enter the Long Term Average time in seconds. Fractions of a
second may be entered.
Ratio Filter:
The Ratio Display list box will only display ratios above or
equal to this number.
Ratio Display List Box:
Displays the STA/LTA time and ratio average information.
Calculate Button:
Starts the STA/LTA calculation.
Save File Button:
Saves the data to a file.
Help Button:
Opens this documentation.
Close Button:
Closes the dialog box.
Maximum Ratio Text:
Displays the maximum STA/LTA ratio and the time the ratio was calculated.
[Top]
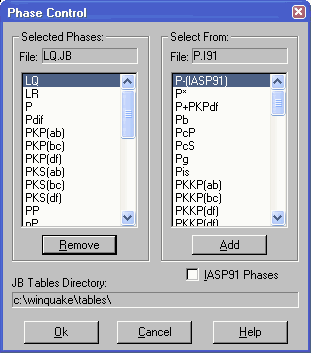
This dialog box controls what additional phases will be displayed when the Display
Phases feature is enabled. WinQuake maintains two sets of additional phase names, one is
for the JB travel-time tables and the other is for the IASP91 tables. The IASP91 Phases
check box is used to switch between the two sets of names.
Selected Phases File Text:
Displays the currently selected phase name that will be deleted if the Remove
button is used.
Selected Phases List Box:
Displays the list of phase names that will be displayed when the Display Phases feature
is enabled.
Remove Button:
Used to remove a Selected Phases: item from the list box.
Select From File Text:
Displays the currently selected phase name that will be added to the Selected
Phases list box when the Add is used.
Select From List Box:
Displays the list of phase names that can be added to the Selected Phase list box.
Add Button:
Used to add the currently selected Select From: List box item to the Selected
Phases: list box.
IASP91 Phases:
Used to switch between the JB and IASP91 travel-time table display names.
JB Tables Directory Text:
Displays the directory name that holds the JB travel-time table files used by WinQuake.
Use the File/Tables Directory menu item to change the directory used to hold the
travel-time table files.
OK Button:
Close dialog box and use Phases displayed in the Selected Phases List box. Selected
Phases are saved in the PHASES.DAT file.
Cancel Button:
Close dialog box without using, or saving, new list of Display Phases.
Help Button:
Opens this documentation.
[Top]
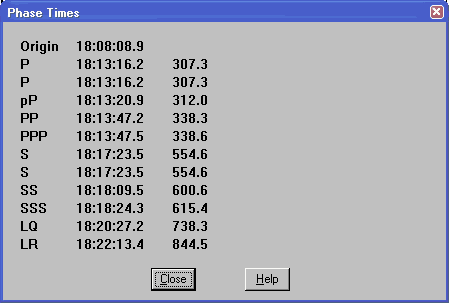
This dialog box displays the time of origin of the event, based on the location of the
P and S markers, and the different phase times. Additional phases can be displayed by
adding them to the Selected Phases list box in the
Phase Control dialog box. The third column is the
time difference in seconds between the origin time and the phase arrival time. This dialog box is modeless, meaning
that you can do other things within WinQuake while this dialog box is open. As
an example, if you move the P or S markers the values in this dialog box will be
updated with the new phase information.
Close Button:
Closes the dialog box.
Help Button:
Opens this documentation.
[Top]
[Top]
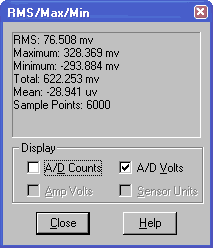
This dialog box is used to display the RMS (Root Means Square),
maximum and minimum values of the event window. The data can be displayed in A/D
counts or if known sensor units. The RMS and other values are calculated using
the data in the current window view area. This dialog box is modeless, meaning
that you can do other things within WinQuake while this dialog box is open.
Whenever the X-Scale changes or the window start time changes, the program will recalculate
the values based on the new start time or window time length.
Display A/D Counts Check Box:
Displays the values in A/D counts.
Sensor Units Check Box:
Displays the values in sensor units of acceleration,
velocity or displacement depending on the sensor type. This check box will
be disabled if the sensor output type or sensitivity fields of the event
file header are not specified.
Close Button:
Closes the dialog box.
Help Button:
Opens this documentation.
[Top]
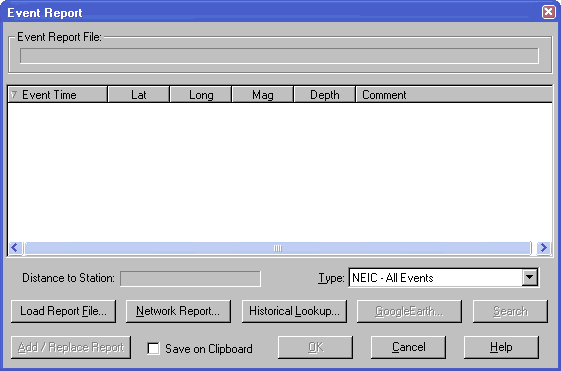
Used to select a event report. The event report contains information about the
earthquake, like location and magnitude, that can be added to the event window and saved
in the event file. See Using the Event Report Feature documentation
for more information.
Event Report File Text:
Displays the current event report file. Use Load Report File or Load
Network Report to load a new file.
Distance to Station Text:
Displays the distance in km and miles between the station and the currently selected
event in the List box.
Report Type Select Box:
Shows a list of event report types that WinQuake supports. WinQuake will try to select
the proper type based on the information within the event report. You may need to select
the event report type if WinQuake can not find the keywords used to automatically select
the type.
Report List Box:
Displays the list of events that can be selected for the new event report. Double
clicking on an event will add the event report to the current event window and close the
dialog box. This is the same thing as pressing the Add Report and then the OK
button.
Up / Down Control:
Used to control the direction, either newer events on top or bottom, of the list box.
Load Report File Button:
Opens the Report Open File dialog box. Use this dialog box to select a new
event report file. If WinQuake knows the format of the report file, the list box will
display the list of events.
Network Report Button:
Opens the Network Event Report dialog box. Using
this dialog box an event report file or Web page can be downloaded over the Internet using
the Web, FTP or finger services. After downloading the event report file, the List box
will display the new list of events.
Historical Lookup Button:
Opens the Network Event Report dialog box.
Only the historical servers will be displayed in the Network Service list box.
See the Historical Data Lookup dialog box for
more information.
Save on Clipboard Check Box:
If checked, the event report will be placed on the system's clipboard as a
text message. This information can be used to transfer the event information to
other programs like WinSDR.
Search Button:
Search for an event report in the list box. The search time used is the event file
start time. If the search fails, you should manually search for the event in the
list box.
Add / Replace Report Button:
Adds or replaces the currently selected event report to the event file.
OK Button:
Close dialog box and use new event report information.
Cancel Button:
Close dialog box without using new event report information.
Help Button:
Opens this documentation.
Additional Information:
WinQuake requires that the REPORT.DAT file be located in the same directory as the
executable (winqk32.exe) for this feature to work. This file contains information on how
to parse the event report information.
[Top]
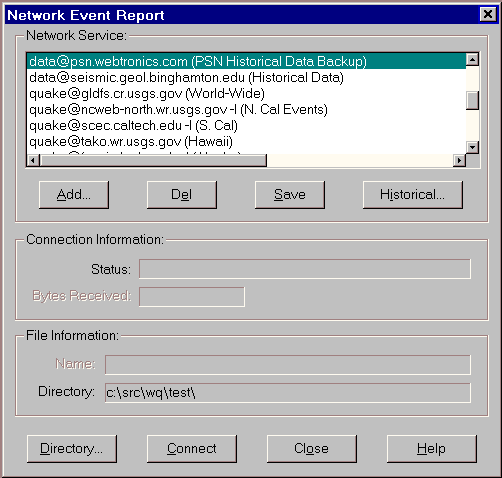
Used to download event report information over the Internet.
Network Service Group:
List Box:
Displays the list of event report services available on the Internet that WinQuake
supports. Event reports can be download by selecting the service in the List box and then
Connect. Double clicking on the service name will also start the download.
Add Button:
Opens the Add Network Report Service dialog box. This
dialog box is used to add a Web page, FTP address or Finger command to the list of event
report services.
Del Button:
Used to delete the currently selected event report service in the List box.
Save Button:
Used to save the new list of event report services to the NETWORK.DAT file.
Historical Button:
Opens the Historical Data Lookup dialog box. This button will be enabled if one of the historical event database
services is selected. Historical service names start with data@.
Connection Information Group:
Status Text:
Displays the status of the download. Any download or connection errors will be displayed here.
Bytes Received Text:
Displays the number of bytes received as the file is being downloaded.
File Information Group:
Name Text:
Displays the file name of the event report.
Directory Text:
Displays the directory where the event report file will be placed after the download.
Directory Button:
Opens the change Directory dialog box. This dialog
box is used to select a directory where the event report file will be placed after the
download.
Connect Button:
Start the event report file download. If the download is successful, the dialog box
will be closed and the event report dialog box will use the new event report.
Close Button:
Close dialog box.
Help Button:
Opens this documentation.
Additional Information:
The lists of services are saved in a file called NETWORK.DAT. This file must be located
in the same directory as the program executable (winqk32.exe or winqk64.exe).
[Top]

The Historical Data Lookup dialog box is used to enter the start
and end dates for the historical database lookup request and to specify a magnitude filter.
Start Date Edit Boxes:
Enter the request start date.
End Date Edit Boxes:
Enter the request end date.
Magnitude Edit Boxes:
You can filter the event data sent back from the server my
entering different magnitude numbers in the edit boxes. The Maximum
filter will be disabled when the data@seismic.geol.binghamton.edu
server is used to retrieve event report information.
Connect Button:
Press this button to start the event database lookup. When
the downloading of the data is completed, the event list will be displayed
in the Event Report dialog box. Use the Cancel
button in the Network Report dialog box
to stop the data download.
Cancel Button:
Closes the dialog box without accessing the database.
Help Button:
Opens this documentation.
Additional Information:
This dialog box is opened from the Network
Report dialog box when you press the Historical button. This button
will be enabled if one of the historical servers is selected in the Network
Service list box. Historical servers start with data@... If you use the Historical
button in the Event Report dialog box, the Network Services list
box in the Network Report dialog box will
only list historical services.
Currently there are two historical servers available on the
internet that can be used with WinQuake. The PSN server can be accessed using
this service: data@quake.seismicnet.com
and the backup server at data@psn.webtronics.com.
This database of events covers the period 1979 to present. Event data is retrieved
once a day, at midnight local time, from the CNSS composite database. See this
page for more information http://quake.geo.berkeley.edu/cnss/cnss-catalog.html.
Only events larger then or equal to 2.5 are saved in the PSN database.
The other database can be accessed using data@seismic.geol.binghamton.edu.
This database covers the period 7/1999 to present and lists events equal too
and larger then 3.0. This database is used by Alan Jones's Seismic-Eruptions
program. See http://www.geol.binghamton.edu/faculty/jones/jones.html
for more information on Alan's excellent Seismic-Eruptions and Seismic-Waves
programs.
[Top]
Add Network Report Service Dialog Box
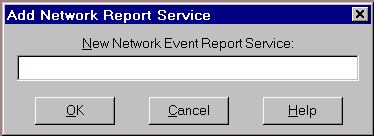
Used to add a new Internet Event Report service URL.
New Network Event Report Service Edit Box:
New Web page address (URL), FTP location, finger command or historical
server. An optional comment can be added after the service location.
OK Button:
Close dialog box and add new event report service.
Cancel Button:
Close dialog box without adding new event report service.
Help Button:
Opens this documentation.
Additional Information:
Event report services can be an Internet Web page address in the format http://location/document,
FTP location in the format ftp://location/document, or finger command in the
format name@domain.name.
Examples:
Web Page Address:
http://www-socal.wr.usgs.gov/given/review/hyp.list (So. Cal Events)
Note: The "(So. Cal Events)" part of the string is the optional comment.
FTP Location:
ftp://quake.usgs.gov/newlist.dat (Northern Cal List)
Finger Command:
quake@gldfs.cr.usgs (World-Wide)
[Top]
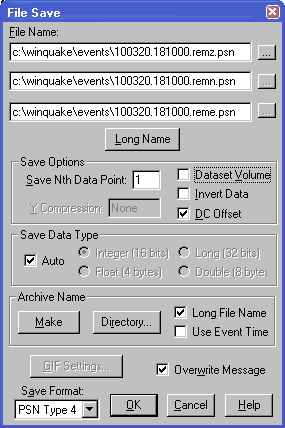
Used to save event files in PSN
Binary Type 4, PSN
Binary Type 3, PSN Text or SAC Binary formats. Event
windows can also be saved as GIF images. The File Save dialog box has been changed to support the Three Component Display and dataset volume features.
The dialog box now has three File Name edit boxes, one for each of the records that can be added to
the same Event Window or used to save the records in a dataset as individual files. To do this,
uncheck the Dataset Volume check box.
One other change is the removal of the View Only check box. To crop an event file, use the View / Crop menu items and then save the file(s).
File Name Edit Box:
File name(s) and directory that will be used when saving an event file dataset or GIF image file.
Up to three file names will be displayed if you are viewing or creating a
dataset volume.
Long Name Button:
Converts a 8.3 format file name, example 020403A.LC1, to the long file
name format. See the Long File Name check box for more information.
Browse Button:
Opens the Windows Save As dialog box. This dialog box can be used to
select a name and / or directory that will be used to save the event file data or GIF image.
Save Options Group:
Save Every Nth Data Point Edit Box:
Used to compress the size of the event file by reducing the sample rate. A value of one
saves every data point. A value of two saves every other data point reducing the file size
by 1/2 and lowering the sample rate by 1/2. A value of three saves very third data point
etc. Input Range: 1 to 1000
Y-Compression Edit Box:
Used when saving PSN Type 4, SAC or Seed volume data to a PSN Type 3
binary file. This is needed because PSN Type 4, SAC or Seed files use floating point or long
32-bit integers numbers that can be larger then
allowed in the PSN Type 3 binary format. WinQuake will calculate a divide number based on the
dataset. This number can be overwritten by using the edit box.
View Only Check Box:
If not checked, save entire dataset. If checked, only save the part of the dataset being
viewed. This check box control is dimmed when the entire dataset is being viewed.
Invert Data Check Box:
If checked, data will be inverted as it is being saved.
DC Offset Check Box:
If checked, WinQuake will apply the current DC offset to the data when
saving the event file. See the DC Offset dialog box for more information.
Save Data Type Group:
This group will be enabled if the Save Format select box is set to PSN Type 4. It
controls how WinQuake will save the data in the event file.
Auto Check Box:
If checked, WinQuake if pick the best format to use when saving data.
Integer (16 bits) Check Box:
If checked, the data will be saved as 16 bit integers.
Long (32 bits) Check Box:
If checked, the data will be saved as 32 bit longs.
Float (4 bytes) Check Box:
If checked, the data will be saved as IEEE floats.
Double (8 bytes) Check Box:
If checked, the data will be saved as IEEE doubles.
Archive Name Group:
Make Button:
Creates an archive name based on the dataset start time. See below for more information.
Directory Button:
Sets the root directory for the Make Archive Name feature. See below for more information.
Long File Name Check Box:
If check, WinQuake will name the file using the long file format. A
typical long file name looks like this: 020407.201921.mete.psn. The format
is: year-month-day.hour-minute-second.station_id.psn.
Use Event Time:
If checked, the file name will be based on the event time rather then
the start time of the dataset.
GIF Settings Button:
Opens the GIF Settings dialog box.
Overwrite Message Check Box:
If checked, and a file with the same name exists, you will be prompted before
overwriting the file.
Save Format Select Box:
Used to select the output file format. Four output formats are currently supported:
PSN Type 4,
PSN
Type 3, PSN Text, SAC binary and GIF image.
OK Button:
Close dialog box and save file using the selected Save Format and File Name.
Cancel Button:
Close dialog box without saving file.
Help Button:
Opens this documentation.
Additional Information:
The Archive Name feature of WinQuake is used to normalize event file names and their
location on your hard disk. The Directory button is used to set up a root directory where
your event files can be placed. After selecting a root directory (this only needs to be
done once), event files will be placed in the following directory when you select the Make button:
drive:\root_directory\YYMM\
The drive:\root_directory\ part of the name comes from the drive and directory selected
using the Directory button. The \YYMM\ subdirectory is based on the dataset start time
year and month.
[Top]
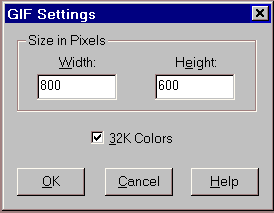
This dialog box is use to control the size of the GIF image when saving an event window
as a GIF file. There is also a check box to correct color problems with the
image created by WinQuake.
Height Edit Box:
Controls the height of the image in pixels. Range: 100 to 2048.
Width Edit Box:
Controls the width of the image in pixels. Range: 100 to 2048.
32k Colors Check Box:
On some systems you may need to check this check box so that the colors
of the image match the ones you have chosen for your seismogram.
OK Button:
Close dialog box and use new settings. Settings are also saved in the WinQuake INI file.
Cancel Button:
Close dialog box without using or saving settings.
Help Button:
Opens this documentation.
[Top]
Travel-Time Tables Dialog Box
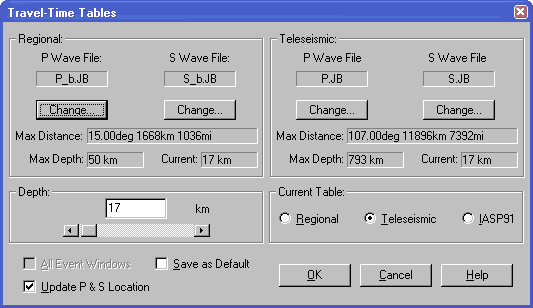
This dialog box selects which set of P and S wave travel-time table files will be used
for regional or local events, and teleseismic or distant events. It also selects which set
of tables, either regional, teleseismic JB tables or the IASP91 set of travel-time
tables, to use with the event file being displayed. See How
WinQuake Calculates Distance for more information.
Regional Group:
P Wave File Text:
Displays currently selected regional P wave travel-time file name.
P Wave File Change Button:
Opens the Change P or S
Wave File dialog box. This dialog box is used to select a new P wave file.
S Wave File Text:
Displays currently selected regional S wave travel-time file name.
S Wave File Change Button:
Opens the Change P or S Wave File
dialog box. This dialog box is used to select a new S wave file.
Max Distance Text:
Displays the maximum distance supported by the currently selected P and S wave tables.
Teleseismic Group:
P Wave File Text:
Displays currently selected teleseismic P wave travel-time file name.
P Wave File Change Button:
Opens the Change P or S Wave File
dialog box. This dialog box is used to select a new P wave file.
S Wave File Text:
Displays currently selected teleseismic S wave travel-time file name.
S Wave File Change Button:
Opens the Change P or S Wave File
dialog box. This dialog box is used to select a new S wave file.
Max Distance Text:
Displays the maximum distance supported by the currently selected P and S wave tables.
Depth Edit Box and Slide Control:
This edit box and slide control change the depth that will be
used for travel-time calculation.
Current Table Group:
Regional Check Box:
If checked, the currently displayed event file window will use
the regional tables for distance calculation.
Teleseismic Check Box:
If checked, the currently displayed event file window will use
the teleseismic tables for distance calculation.
IASP91 Check Box:
If checked, the currently displayed event file window will use
the IASP91 tables for distance calculation.
All Event Files Windows Check Box:
If checked, all event windows will be changed to the new settings.
Save as Default Check Box:
If checked, the P and S wave file names and the status of the
Current radio buttons will be saved to the WinQuake INI file.
Update P & S Location Check Box:
If checked, the P and S markers location will be updated using
the new table information.
OK Button:
Close dialog box and use new Travel-Time Table settings.
Cancel Button:
Close dialog box without using new Travel-Time Table settings.
Help Button:
Opens this documentation.
[Top]
This dialog box is used by the Travel-Time Tables
dialog box to select either a P or S wave travel-time table file.
File Name Text:
Displays currently selected travel-time file.
File Name List Box:
Used to select new travel-time table file.
OK Button:
Close dialog box and use new travel-time file.
Cancel Button:
Close dialog box without using file.
Help Button:
Opens this documentation.
[Top]
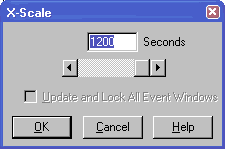
Used to control the X, or time, scale of the event window. By
changing the X-Scale you can zoom in or out within the dataset. Zoom in can also be done
with the mouse.
Edit Box:
Enter the new X-Scale in seconds. Range: 1 to the total number of
seconds of the event file.
Scroll Bar:
This control can be used to change the X-Scale number in the Edit box.
Update and Lock All Event Windows Check Box:
If this check box is checked, WinQuake will update all Event Windows when
either the X-Scale changes or the user changes the Event Window start time,
using the scroll bar, in any of the open event Windows. The X-Scale or
start time changes only effect Event Windows that have the same time span.
This setting also effects new event windows opened using the Open File Dialog
Box. If this setting is enable, any new Event Windows that has the same time
span as the other Event Windows will be displayed with the current X-Scale and
start time. This setting will stay in effect until you turn it off or you
close all opened Event Windows.
OK Button:
Close dialog box and use new X-Scale.
Cancel Button:
Close dialog box without using new X-Scale.
Help Button:
Opens this documentation.
[Top]
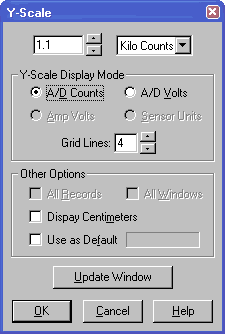
The Y-Scale number, controlled by the Y-Scale dialog box
and the vertical scrollbar now specifies the maximum peak counts,
volts or sensor units to display. As an example, if the display mode
is set to display A/D counts and the Y-Scale is set to 1000, WinQuake
will draw a y-grid from 0 to +- 1000 A/D counts. The Y-Scale Display
group controls the display mode. The default is A/D counts if the
Sensitivity field of the header is 0 and the event file does
not have the SensorAmpAtoD data structure ( see above). If the A/D
voltage and amplifier gain are specified, the user can select either
the voltage seen by the A/D converter or the input to the amplifier
if the Amp Volts item is selected.
The current Y-Scale is displayed in the toolbar and in the text
portion of the event window. The Y-Scale label can be one of the
following: c = counts, v = volts, m = meters or Sensor Unit. If the
Y-Scale Display is set to counts, the Y-Scale label can be: "Mc"
= megacounts, "kc" = kilocounts, "c" = counts,
"mc" = millicounts, "uc" = microcounts and "nc"
= nanocounts. If the display mode is set to Amp or A/D Volts, the
label can be "nv" = nanovolts, "mv" for
millivolts, "v" = volts and "kv" = kilovolts. If
the display mode is set to Sensor Units, the label can be "nm"
= nanometers, "mm" = millimeters, "cm" =
centimeters and "m" = meters.
Y-Scale Dialog Box Other
Options Group:
All Records Check Box:
If checked, the new
Y-Scale value will be applied to all of the records in the current
selected Event Window. This check box will only be enabled if two or
three event files are being displayed in the same Event Window. See
Three Component Display documentation below for more information.
If checked, the new
Y-Scale value will be applied to all Event Windows. This check box
will be enabled when there are two or more open Event Windows.
If checked, WinQuake
will display the cm label when the Y-Scale or sensor data goes
between 10.0 mm (millimeters) and 1 meter. If not checked, the label
will remain mm until 1 meter is reached.
If checked, the
current Y-Scale value will be used as the Y-Scale for any new event
Window. The Use as Default switch and Y-Scale value are saved
in the winquake.ini file and will be used again when WinQuake is
restarted.
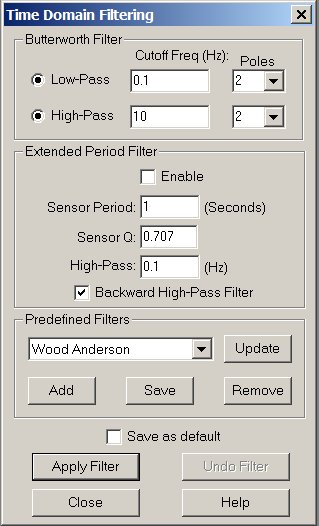
This dialog box is used to control filtering of the dataset in the time domain. The
filter applied is a Infinite Impulse Response low or high pass Butterworth filter. The Low-Pass and High-Pass
frequency edit boxes can now accept seconds, or the period of the cutoff frequency, as an input.
Example: Entering "20 s or 20s" in either filter frequency edit boxes will produce a frequency of 0.05 Hz (1.0 / 20.0).
The
Extended Period Filter group is used to control the period extending filter.
This type of filter compensates for the 12db roll-off per octave of a sensor
like a geophone or Lehman below the period of the
sensor.
The user can now create one or more predefined filters. To use this feature, enter the filter
parameters in the Butterworth Filter Type group and select the Add button.
Enter the name of the filter in the next dialog box. The new filter name should now show up in the
filter drop list. Whenever you change the filter drop list, the new filter information will be
updated in the Butterworth Filter Type group. The Update button updates the
Butterworth Filter Type group with the predefined filter parameters of the currently selected
filter drop box. The Remove button removes the current selected predefined filer. Currently there
is no way of editing the predefined filter parameters. To change the filter parameters you will need
to remove the filter and then use the Add button to re add the filter to the predefined filter list.
Butterworth Filter Group -
Low-Pass Check Box:
If checked, a low-pass filter will be applied to the dataset.
Low-Pass Cutoff Freq Edit Box:
Enter the low-pass filter cutoff frequency.
Low-Pass Poles Select Box:
Select the number of poles that will be used when filtering the dataset. The number of
poles controls the slope of the filter.
High-Pass Check Box:
If checked, a high-pass filter will be applied to the dataset.
High-Pass Cutoff Freq Edit Box:
Enter the high-pass filter cutoff frequency.
High-Pass Poles Select Box:
Select the number of poles that will be used when filtering the dataset. The number of
poles controls the slope of the filter.
Extender Period Filter Group -
Enable:
Enables the period extender filter.
Sensor Period:
This is the period of the sensor in seconds ( 1 / Hz ).
Sensor Q:
This is the Q of the sensor. Sensors used to record earthquakes are
usually setup for a damping factor of .7 (70 %).
High-Pass:
The High-Pass filter sets how far the sensor's period should be extended.
Backward High-Pass Filter:
Performs another High-Pass filter on the dataset but from the end of the
dataset to the beginning. This reverse filter compensates for any phase
shifting that happens do to the forward High-Pass filter.
Predefined Filters Group -
Filter Name Drop Box:
Used to select one of the predefined filters.
Update Button:
Updates the filter fields with the selected predefined filter.
Add Button:
Adds the current filter settings to the predefined filter list.
Save Button:
Saved the updated predefined filter to the filter.dat file.
Remove Button:
Removes the selected filter from the predefined filter list.
Save as default Check Box:
If checked, the entries in the various fields will be saved
as the default values. This values will be displayed when the dialog box is first opened.
Apply Now Button:
Applies the high or low pass filter to the dataset.
Undo Filter Button:
Undoes the last filter applied to the dataset.
Close Button:
Closes the dialog box.
Help Button:
Opens this documentation.
[Top]
Low-Pass or High-Pass Filter Dialog Box
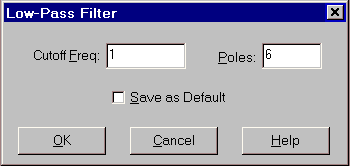
Used by the FFT (frequency spectrum) window to filter the event dataset with either a
Low-Pass or High-Pass filter. Filtering can be used to remove unwanted noise in the
seismogram.
Cutoff Freq Edit Box:
Enter the filter cutoff frequency.
Poles Edit Box:
Enter the number of poles that will be used when filtering the dataset. The number of
poles controls the slope of the filter.
Save as Default Check Box:
If checked, the cutoff frequency and number of poles will be used as the default value
for either the Low-Pass or High-Pass Filter. These settings are saved in the WinQuake INI file.
OK Button:
Close dialog box and apply the filter to the dataset.
Cancel Button:
Close dialog box without filtering the dataset.
Help Button:
Opens this documentation.
[Top]
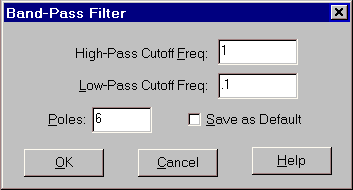
Used by the FFT (frequency spectrum) window to filter the event
dataset with either a Bandpass or Notch filter. Filtering can be used to remove unwanted
noise in the seismogram.
High-Pass Cutoff Freq Edit Box:
Enter the High-Pass cutoff frequency.
Low-Pass Cutoff Freq Edit Box:
Enter the Low-Pass cutoff frequency.
Poles Edit Box:
Enter the number of poles that will be used when filtering the
dataset. The number of poles controls the slope of the filter.
Save as Default Check Box:
If checked, the Low-Pass or High-Pass cutoff frequencies and
number of poles will be used as the default value for either the Notch or Bandpass Filter.
These settings are saved in the WinQuake INI file.
OK Button:
Close dialog box and apply the filter to the dataset.
Cancel Button:
Close dialog box without filtering the dataset.
Help Button:
Opens this documentation.
[Top]
About WinQuake Dialog Box
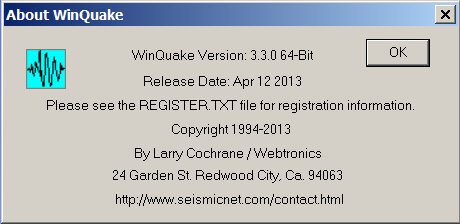
This is WinQuake's About dialog box. It displays information
like version number, release date and author contact information.
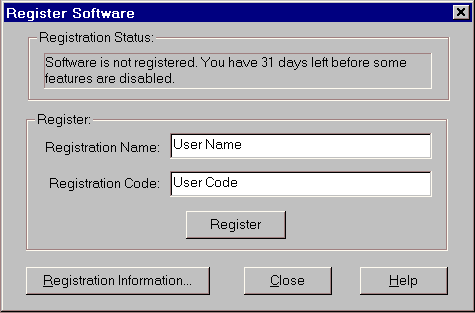
This dialog box is used to register your copy of WinQuake. Please see register.txt for more
information on registering your copy of WinQuake.
Registration Status:
Displays the current registration status.
Registration Name Edit Box:
When you register your copy of WinQuake you will be given a name
and code. Place the name in this edit box. Make sure that you do not have any leading or
trailing spaces and that all upper and lower case characters are correct.
Registration Code Edit box:
Place your registration code in this edit box. Make user you only
enter six numbers in this field.
Register Button:
After entering your name and code press this button. If you get an error message make
sure you entered the correct name and code.
Registration Information Button:
Displays the register.txt file.
Close Button:
Close dialog box.
Help Button:
Opens this documentation.